Automatic Repair Couldn’t Repair Your PC is a prevalent issue. Perhaps the most potent tool comes built-in with a magical tool that helps you deal with almost all problems. You know it as the automatic repair. As the name suggests, this tool runs all the required diagnostics with the help of its troubleshooter. Applies the preloaded fixes to the issues detected. That’s why it always finds its way into one of my suggested methods whenever I write a post on fixing some Windows operating system issues.
But sadly, the automatic repair doesn’t always work like a charm on your PC. Sometimes, it fails to identify the problem, and hence, it fails to fix it as well. How ironic, eh? A tool is always present in most software troubleshooting articles is now getting a repair guide written on itself. To fix it, try using the command prompt from Windows 10 boot menu, Boot into Safe Mode, and run Command Prompt, Disable Early launch anti-malware protection or Disable the Automatic Repair on Startup.

We must remember that no repair software will ever be perfect in every way. There will always be new issues and bugs that the built-in tool may not be able to identify just because it does not know what that error means and how to fix it. So, when you see an error message like automatic repair couldn’t repair your pc or Windows 10 automatic repair your pc did not start correctly, it is safe to assume that the automatic repair software is just as clueless as you are regarding how to fix the issue which is currently plaguing your system.
See Also: Computer Goes To Sleep Too Fast | How To Fix
How to Fix Automatic Repair Couldn’t Repair Your PC
Without further ado, let’s try Four efficient methods by which we can fix the automatic repair couldn’t repair your PC issue.
Method 1: Use the command prompt from the Windows 10 boot menu
You first need to enter into Windows 10 boot options. You do that by inserting the installation disk and clicking on the respective options on the screen.
1. Once the boot menu is loaded, choose the Troubleshoot option, followed by Advanced Options.
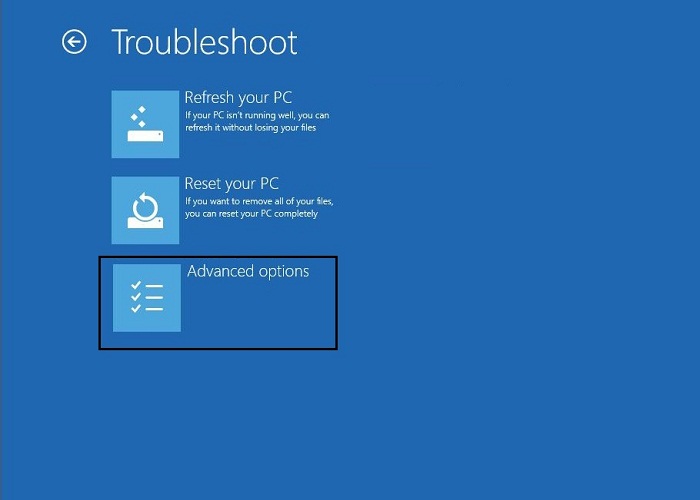
2. Then, select the Command Prompt option from the list. 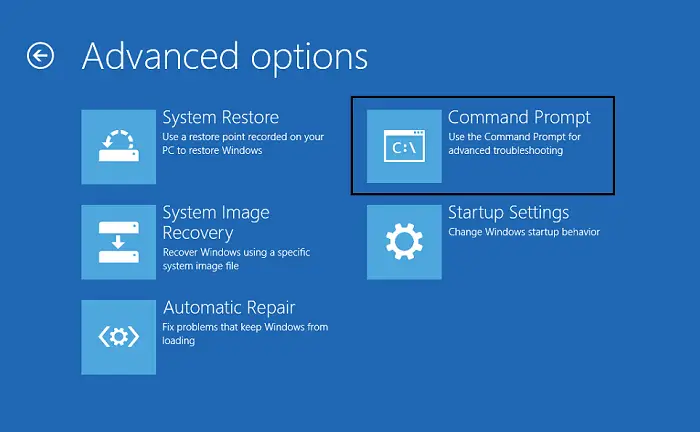
3. When the Command Prompt loads up, type the following lines one by one and press the Enter button after each line to execute the command.
bootrec.exe /rebuildbcd
bootrec.exe /fixmbr
And, finally –
bootrec.exe /fixboot 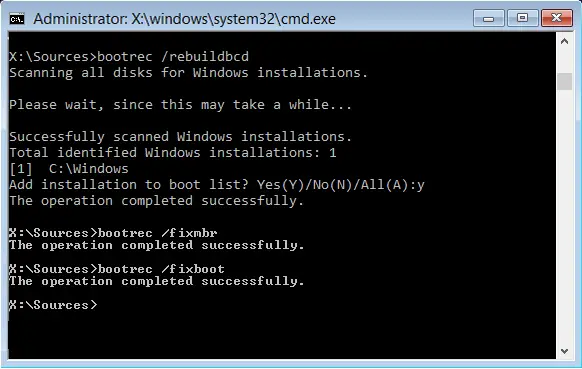
4. It is also recommended that you need to run some additional chkdsk commands as well. To perform these commands, you must have an idea of the drive letters for all your hard disk partitions. So, once you have all the drive letters in your head, type the following commands in the Command Prompt, but make sure to use the same letters that match your hard disk partitions on your PC
chkdsk /r c
chkdsk /r d
After typing each line hit enter as usual. Once done, just restart your computer, then, check and see if the issue has been resolved. If you are still getting the automatic repair couldn’t repair your PC message for the issue that you’re trying to fix using the automated repair, try one of the next methods. Maybe one of them will do the trick.
You may also like –
- {Solved} Fix Unmountable Boot Volume (STOP: 0x000000ED)
- 8 Ways to Fix Kernel Security Check Failure in Windows 10
Method 2: Boot into Safe Mode and run Command Prompt
Some users have said that the Automatic Repair couldn’t repair your PC message on the Windows 10 operating system is often caused by a corrupted driver, like the Microsoft Windows driver for a wireless mouse or something. So, if you have this problem and use similar hardware, try the following steps to solve this problem.
1. You should be able to boot into the Boot Options menu after your computer has been restarted a few times. Now, go to Troubleshoot option, followed by Advanced options, and then Startup Settings. 
2. Click on the Restart button, and now, your computer should restart and present to you a list of options. Simply choose the Enable Safe Mode with Networking option among the others.
Fix This Right Now: Windows Could Not Automatically Detect Network’s Proxy Settings
3. When the Safe Mode starts up, you will have to download a newer version of the driver that has been giving you problems. You can directly download the driver from the device manufacturer’s website and save it to your USB drive.
4. After this, press the Windows Key + X keys together and choose the Command Prompt (Admin) option from the list.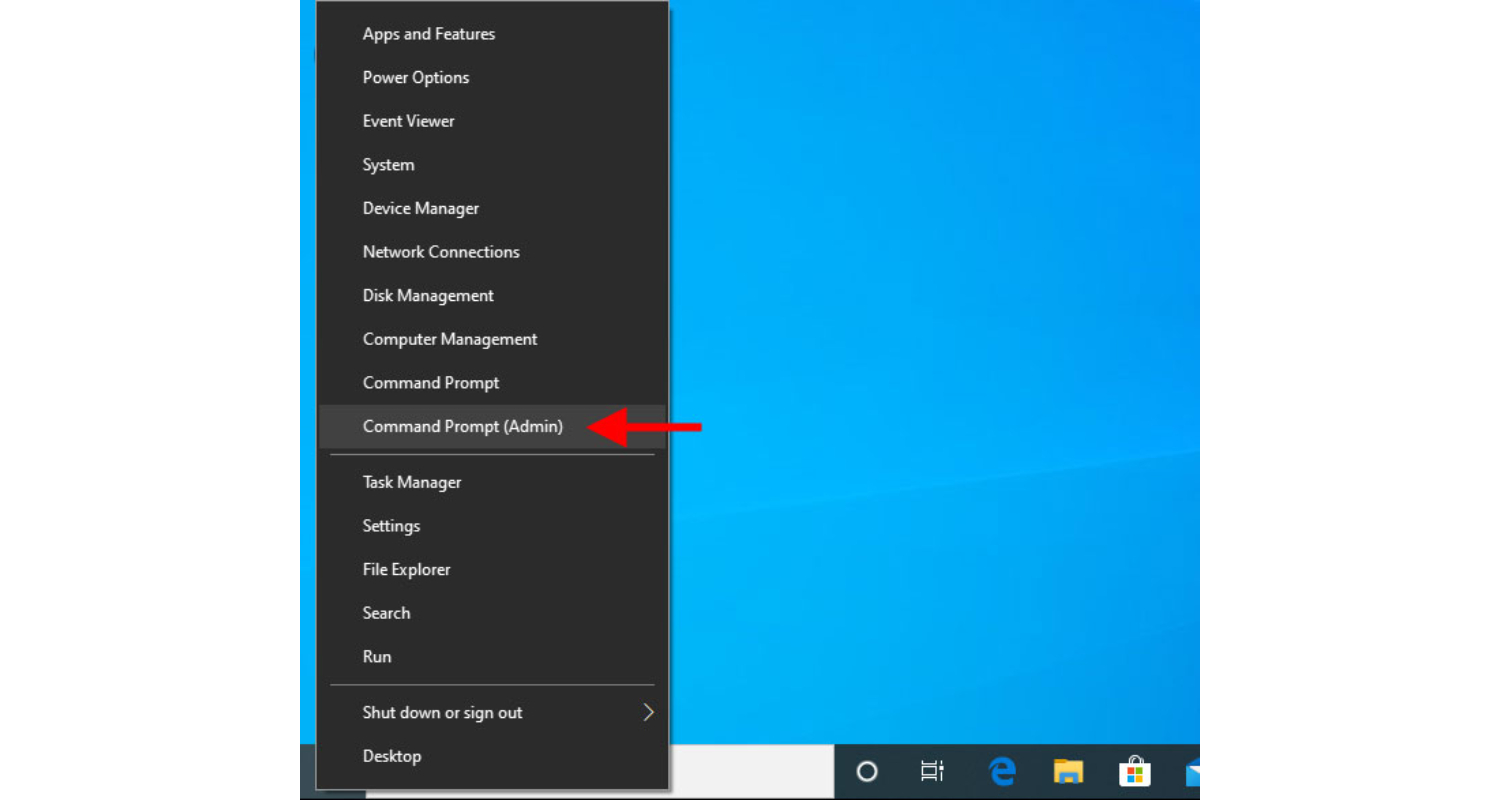
5. When the Command Prompt loads up, enter the following commands one after the other and press the Enter key after each one to run it: 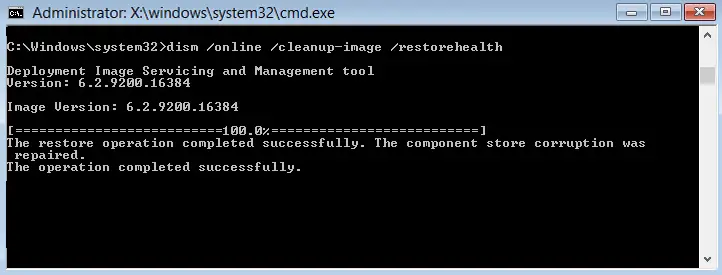
DISM /Online /Cleanup-Image /RestoreHealth
It might take 10 or more minutes to process the instructions completely, so be patient. Do not try to interrupt it while it is still working.
6. After all the processing, restart your computer like you normally would.
7. When the Windows 10 operating system starts back up, install the driver you downloaded; the automatic repair couldn’t repair your pc the issue should be resolved.
But if, for some reason, the updated drivers were of no help and you are still getting the automatic repair, couldn’t repair your PC pop up during any automated repair, well, keep scrolling then. What are you expecting, mate? An official request?
Check Out:
- How to Fix Ethernet Doesn’t Have a Valid IP Configuration
- 5 Ways to Delete System Error Memory Dump Files
- [Solved] How to Stop Skype from Starting Automatically
Method 3: Disable Early launch anti-malware protection
You may have faced these problems since you installed an anti-malware program on your computer. If that is the case, just removing it will most definitely fix the automatic repair couldn’t repair your PC error message.
Boost Your System Speed: 4 Ways to Fix Your Computer’s Low on Memory Error
In the bootup menu, after you click on Advanced options, click on Troubleshoot, followed by Advanced options, and then Startup Settings.
Next, on the Startup Settings page, press the Restart button.
After a restart, you will see a screen with many options with numbers. Pressing the respective keys on the keyboard triggers the respective options on the list. To uninstall or disable an early access anti-malware software program, we must press the 8 key on our keyboard to select the Disable early launch anti-malware protection setting option.
Check Out: What is RAVBg64.exe? 8 Ways to Fix it
If the improperly tuned anti-malware program causes the problem, your system should be free of automatic repair. It couldn’t repair your PC problem now and should restart immediately.
You must remove the aching tooth to eliminate the pain if nothing else works. Not the best solution, I know. That is why I have typed this thing at the very end. I hope your system recovers before this because we will disable the automatic repair.
Don’t miss out –
- 5 Ways to Fix Critical Structure Corruption Error in Windows 10
- {Solved} 6 Ways to Fix BAD_POOL_CALLER BSOD Error
- 4 Ways to Fix Faulty Hardware Corrupted Page in Windows 10
Method 4: Disable the Automatic Repair on Startup (At Boot)
To do that, you must click on the Troubleshoot option from the boot menu again, followed by the Advanced options and Command Prompt. After the prompt opens up, execute the following command. It will permanently disable the automatic Startup Repair from running on your system.
bcdedit /set recoveryenabled NO
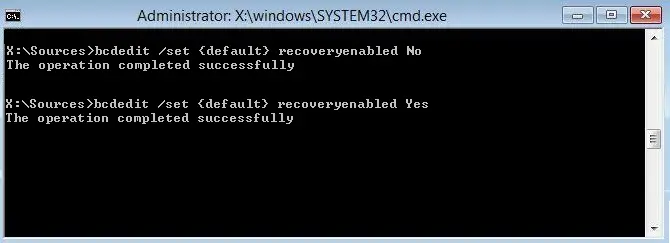
Type or copy-paste the above line into the command prompt and hit the enter button.
You may also like –
10 Ways to Fix Steam Disk Write Error in Windows 10
4 Ways to Fix Faulty Hardware Corrupted Page in Windows 10
{Solved} 10 Ways To Fix Discord Won’t Open Error
FAQS
Why am I seeing the message 'Automatic Repair couldn't repair your PC'?
The message 'Automatic Repair couldn't repair your PC' appears when the Windows Automatic Repair feature fails to fix startup or system errors on your computer.
How can I fix the 'Automatic Repair couldn't repair your PC' error?
To fix the error, you can try booting into Safe Mode, performing a system restore, running the System File Checker (SFC) scan, using the Command Prompt to repair the BCD, or reinstalling Windows.
Can hardware problems trigger the error message?
Yes, hardware problems such as a faulty hard drive, RAM issues, or a malfunctioning motherboard can prevent Automatic Repair from fixing your PC. Troubleshooting or replacing the problematic hardware may be necessary.
Can malware cause the 'Automatic Repair couldn't repair your PC' error?
Yes, malware infections can corrupt system files and prevent Automatic Repair from resolving the issue. Running a thorough antivirus scan using a bootable tool or seeking professional assistance can help remove the malware.
Can I access my files if Automatic Repair fails?
If Automatic Repair fails, you may still be able to access your files by booting from a Windows installation media or using a separate operating system on a different drive. This lets you retrieve your important data before further troubleshooting or reinstalling Windows.
What if the basic troubleshooting steps don't resolve the error?
If basic troubleshooting steps like Safe Mode or system restore don't resolve the 'Automatic Repair couldn't repair your PC' error, you can try more advanced solutions such as using third-party repair tools, seeking Microsoft support, or consulting a professional technician.
Conclusion
Your computer should restart and return to its former glory without errors like the automatic repair couldn’t repair your PC. Also, check for minor errors like Problem Resetting Your PC or Windows 10 Random Restart Error. Do make sure that you follow each of the steps carefully. Also, comment below if you face any issues during the process.

Gravit Sinha: Founder of ValidEdge, a problem-solving website, driven by his lifelong passion for fixing issues.