RAVBg64.exe is an EXE file associated with HD Audio Background Process. EXE files contain step-by-step instructions for a computer to carry out a function. Background programs should not have a problem with excessive CPU utilization due to their relatively low resources. Yet, many people claim to have run into the ravbg64.exe excessive CPU consumption issue.
Fix the ravbg64.exe high CPU usage issue by updating your Realtek audio driver. Update the Realtek audio driver manually, and you can do it automatically with Driver Easy. Ravbg64.exe often operates in the background and shouldn’t consume much memory or processing resources.

If ravbg64.exe uses a lot of CPU, verify that the ravbg64.exe process, which uses a lot of CPU power, is not infected with a virus before moving on to the remedies. It is not a virus if it is located in the Realtek Audio HDA folder. After then, you can use these techniques to resolve the issue.
How to Fix RAVBg64.exe Application Error
If you are getting this message RAVBg64.exe Application Error, the following methods can solve your issue.
Let’s begin.
Method 1: Disable And Enable The Related Realtek Audio Programs
This method can work like a charm. First, disable the Realtek software by following these steps:
1. First, Press the Windows and R keys simultaneously. Then, Type msconfig in the Run dialog box that opens. Click on OK.
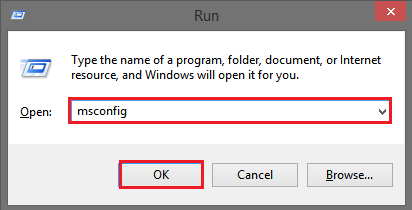
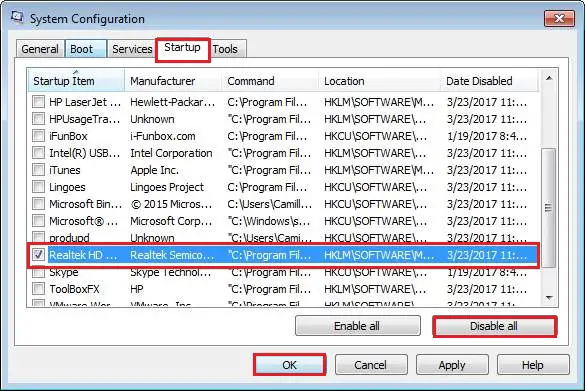
3. In the Startup tab, check all those programs related to Realtek startup programs. Next click on Disable all. Finally, Click OK.
Alternatively, you can disable Realtek software using Device Manager.
1. First, Press the Windows and R keys simultaneously. Then Type devmgmt.msc in the Run dialog box that opens. Afterward, click on OK.
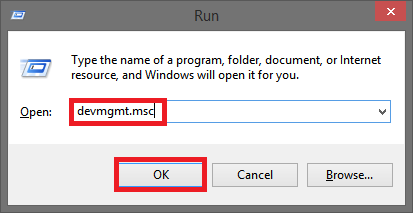
3. Then in the category Sound and video controllers, right click on Realtek audio device. Finally, Select Disable.

After disabling, again follow the above steps to re-enable. Start Task Manager and check if ravbg64.exe is still employing high CPU usage.
Method 2: Add Two Registry Keys
The ravbg64.exe issue can also occur when the SRS Labs and APO are missing. You can check if they are missing and add them manually.
1. First, Press the Windows and R keys simultaneously. Then type regedit in the Run dialog box that opens. Afterward, click on OK.
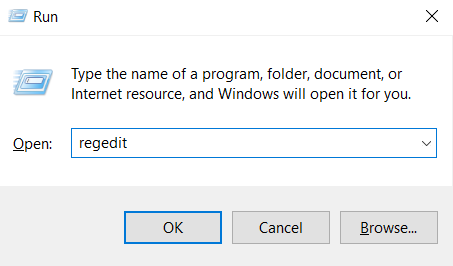
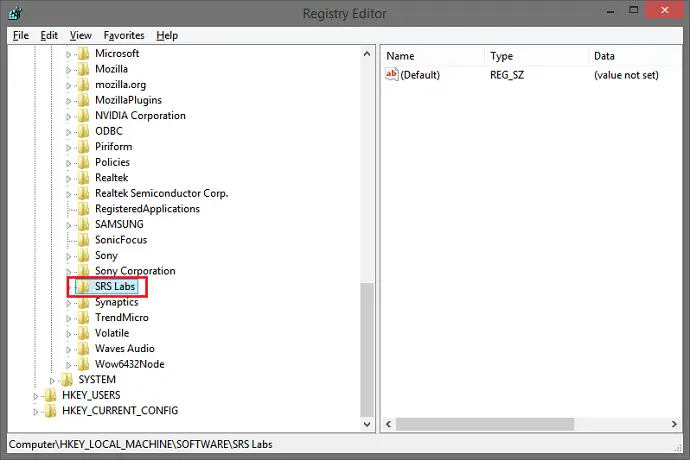
3. Then Navigate to HKEY_LOCAL_MACHINE/SOFTWARE. Within Software folder, find the key “SRS Labs.” If you find it, it is okay. If you don’t, you need to add the key.
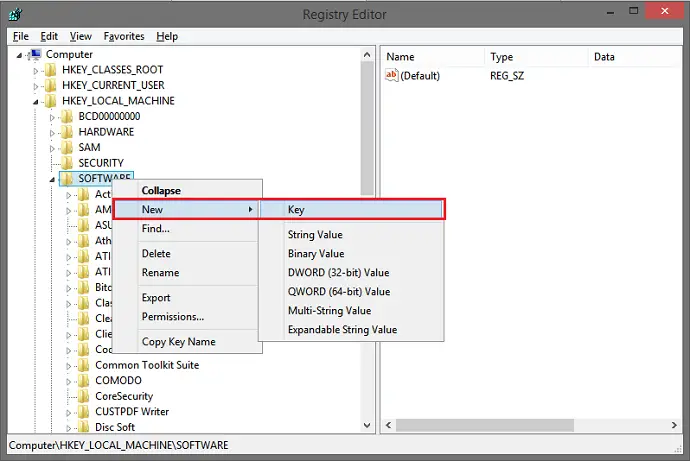
5. Then Right-click on Software, then New -> Key.
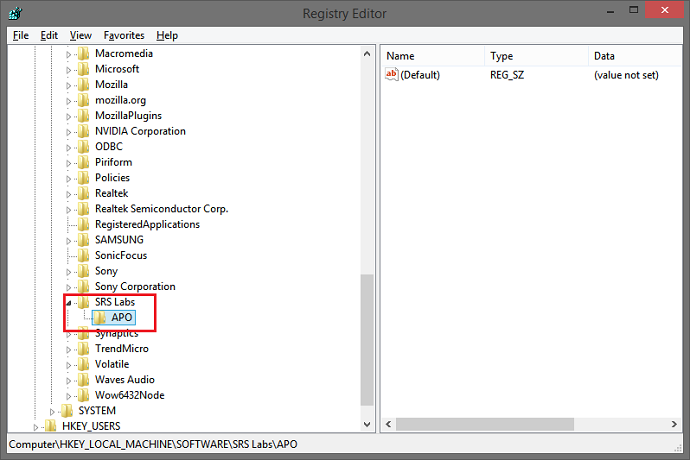
6. Afterward, rename key as SRS Labs. Ensure the spelling is correct. After you add this, right-click on it, and add a subkey. Finally, Rename as APO.
Check Out:
What is Atiedxx.exe? 4 Ways to Fix It {2024 Updated}
After adding these two keys, they will be shown in the Registry editor. Restart your PC. See if the problem persists.
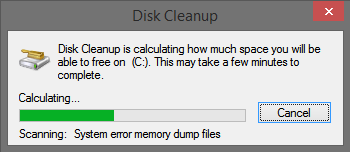
Method 3: Run Disk Cleanup
There may be junk files on your hard drive. It can make the HD Audio Background Process run slowly. Consecutively, it causes the ravbg64.exe issue. To solve this, you can perform disk cleanup. Follow these steps:
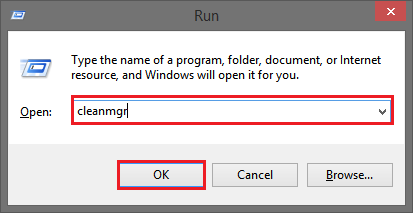
1. First, Press the Windows and R keys simultaneously. Then Type cleanmgr in the Run dialog box that opens. Click on OK.
3. Afterward, the Disk Cleanup utility will calculate your disk space.
4. In the list given, select all the files you want to delete and click OK.
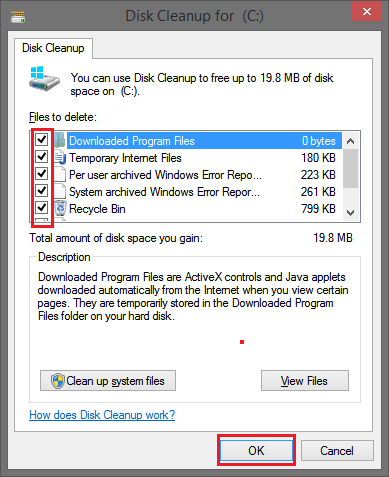
Finally, Restart and see if the problem exists.
Method 4: Run A Virus Scan
Malware infection is also one plausible cause for the ravbg64.exe. This malware can corrupt your system files and change the system settings. It elevates the Windows becoming prone to such errors.
1. First, Restart your PC. Open it in the Safe Mode with Networking. Then open your antivirus program. Within the program, run a full scan of your system.
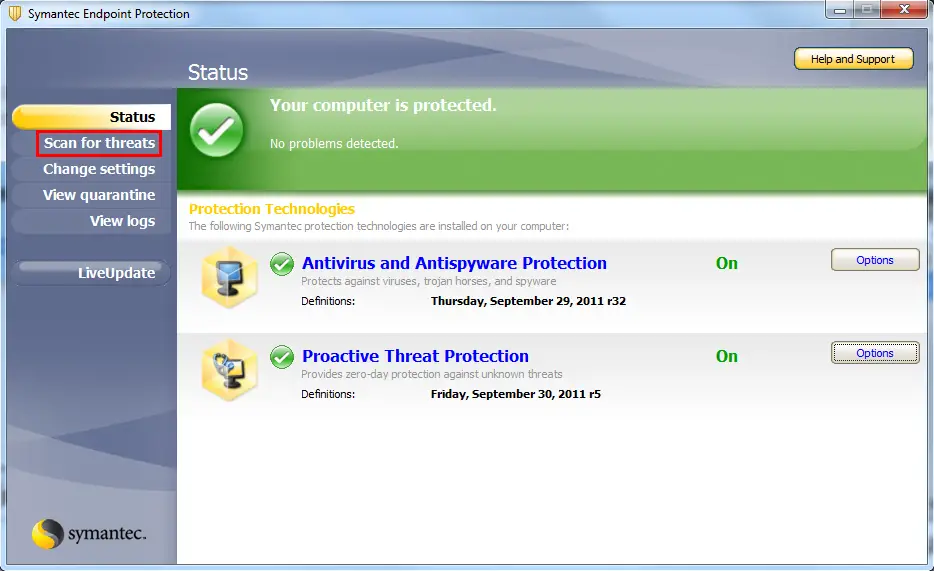
4. Then, on scan completion, remove all the malware detected. Finally, Restart your system. Check if the error still shows.
Don’t miss out –
6 Ways to Fix Your Windows License Will Expire Soon Error
{Solved} 5 Ways to Fix Windows Update Error 80244019
10 Ways to Fix Windows 10 Update Error Code 0x8024a105
Method 5: Replace Corrupted System Files With The System File Checker
Running the system file checker helps in repairing corrupt files.
1. First, Click on Start. Afterward, in the Search programs and files box, type “cmd.” Then press the keys Ctrl + Shift + Enter. Then click on OK. It will open the command prompt. Alternatively, press Windows + X keys. Then click on Command Prompt (Admin).
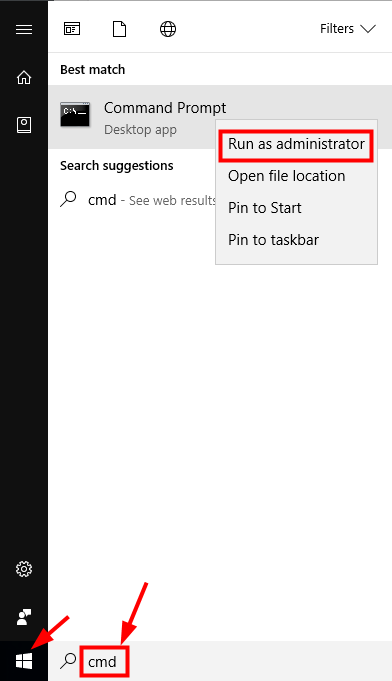
4. Now type “sfc/scannow” at the command prompt.

The process will take some time. Finally, Replace the corrupt files.
The system file checker will replace the corrupted system files related to ravbg64.exe. Restart your system and check if you still get the error.
Method 6: Utilize Your Windows System Restore To Undo Recent System Changes
The System Restore helps you to “go back in time.” It can help you to return to that point when the system was working perfectly. As such, you shall not need to troubleshoot the ravbg64.exe error.
1. First, Click on the Start button. type “System Restore” in the Search box. Afterward, press Enter.
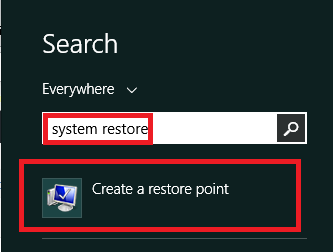
3. You shall have your results for the search. Select System Restore.
4. If passwords are prompted for the administrator, use them.
5. Then Follow the on-screen instructions to choose a restore point.
6. Finally, Restore your system.
Restart your PC now. See if the ravbg64.exe error still exists.
Method 7: Update Your PC Device Drivers
The drivers help in communication between your system and all the installed applications and programs. These drivers should always be kept up-to-date. To see if they need to be updated, follow these steps:
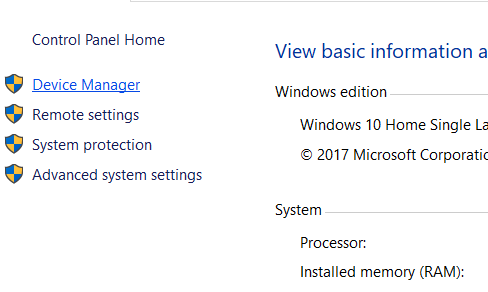
1. First, Right click on My Computer. Then select Properties from the context menu.

3. Then Choose Device Manager.
4. Afterward, see through the devices are given. Check for any that has a yellow exclamation mark on it. Right-click on any of these devices. Then choose Update Driver.
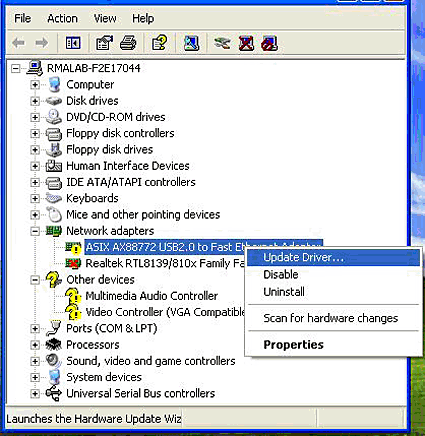
After the update is done, restart your PC. Finally, Check if updating your drivers has solved the ravbg64.exe issue.
Lastly, fix these too –
{Solved} 7 Ways to Fix Windows Update Error 0x80070057
6 Ways to Fix Windows 10 Update Stuck Checking for Updates
{Solved} Fix System Thread Exception Not Handled Error
Method 8: Perform A Clean Installation Of Windows
It is the last method you should try. Before proceeding, you should back up all necessary documents, pictures, and other data. It is a time-consuming step. It will also erase everything from your hard drive. A clean installation will also remove all the junk, and get your computer ready for normal usage.
So these were the methods that you may use to fix the high CPU usage ravbg64.exe error. Hopefully, either of them comes in handy for you.
FAQs
Ravbg64 EXE: What is it?
On Windows systems, a background process called 'RAVBg64.exe' can access the Realtek HD Audio drivers. It is in charge of introducing new audio-related features and functionalities, such as enhancing sound quality and providing audio effects. Before making any changes, it's crucial to exercise caution since deactivating this operation can impact particular audio capabilities.
Is Ravbg64 exe a secure program?
Yes, 'RAVBg64.exe' is recognized as safe software in general. It is responsible for providing audio-related functions coupled to the Realtek audio drivers in a permissible background activity. Like with another program, you must ensure that you are obtaining it from reputable and authorized sources to prevent potential security issues.
Can I stop HD audio from running in the background?
Yes, you may stop HD audio from running in the background on your computer by preventing the relevant process in the task manager or system options. However, proceed with caution, as this could degrade the sound quality. You may activate it immediately if you have to run across any difficulties. It is important to research and understand the impacts before changing background audio processing.
Is it advisable to prevent the startup of Realtek HD Audio Manager?
It might be a good idea to disable the startup of Realtek HD Audio Manager if you don't frequently modify the audio settings and desire to conserve system resources. Disabling it, however, can restrict your power over audio options if you frequently need to configure audio settings. Before choosing to prohibit its launch, consider your usage patterns and preferences.

Gravit Sinha: Founder of ValidEdge, a problem-solving website, driven by his lifelong passion for fixing issues.