VAC Was Unable to Verify the Game Session: The Valve Anti-Cheat System, or in short, the VAC, was developed with the idea of trying to detect modified installation files or configuration files of popular games like Counter-Strike: Global Offensive to prevent malicious users from exploiting workarounds to get an unfair advantage while playing the game.
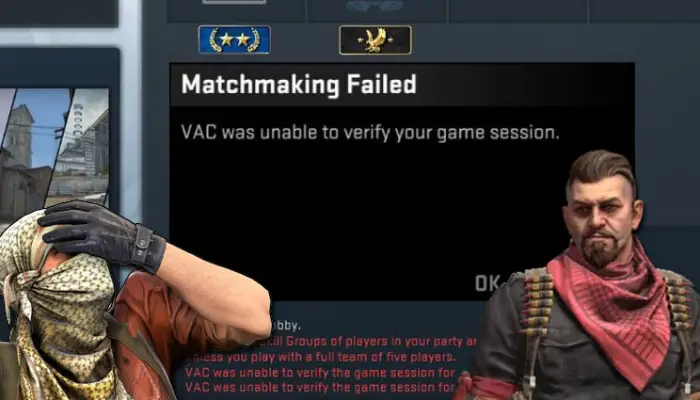

Sometimes, even if some users are not modifying the game or configuration files, VAC may still generate a false positive error and result in VAC being unable to verify the game session error message when you try to start any online game session or official matchmaking. Also, click here if Steam Games is not launching on your windows.
Many gamers like the game known as CS: GO, or Counter-Strike, i.e., Global Offensive. However, many online gamers have reported running into this error when they attempt to join the Steam community to play a game. The error message reads, “VA” could not validate the gaming session and may be seen when one attempts to queue for matchmaking.
Let’s say you’re looking for answers to this issue. One has arrived at the proper location. We will discuss a few fixes to overcome the “VA” that could not validate the gaming session “e” for notification on CS: GO.
See Also : Is Softonic Safe to Download?
5 Ways To Fix VAC Was Unable To Verify The Game Session
If you are using any modifications or enhancements to cheat, now is the best time to stop that, as not only will you be unable to do any matchmaking, but you may get blocked sooner or later. You will not be able to recover your progress or any data.
But if you are not using any such things, here are some of the ways you can try and avoid the VAC being unable to verify the game session error.
Method #1 Log Out of Steam and Log in Again
- Suppose some configuration files have been altered by the operating system or the computer’s file management system. In that case, it may lead to the VAC being unable to verify them and hence will throw the VAC unable to verify the game session error. One of the things you can try to get rid of this issue is to just log out of the Steam account and log in again with the same credentials. This will delete all the configuration files upon logging out and recreate all those files when you log in. To log out and log in again.
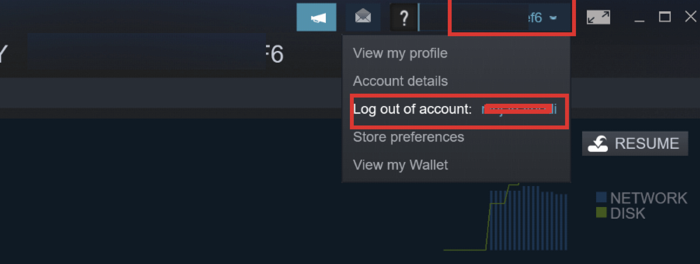
- Click on the Steam icon in the taskbar, the Desktop or the Start Menu and run the Steam application.

- Once it starts up, click on your profile name on the title bar (topmost bar of the window), and in the drop-down menu that expands, click on Log Out of My Account and follow the instructions or the dialogue box.

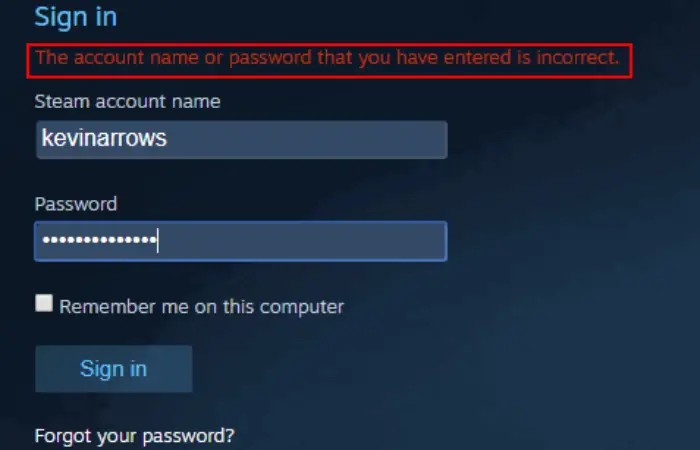
- Log in again with your credentials and click on forgot… if you don’t remember them to reset your password.
This will probably fix your VAC was unable to verify the game session error if it was due to some bad configuration or settings files.
Remember, just re-installing the game will not solve the issue as it will load the game again with the duplicate files and hence will not be able to rectify the error. Reinstalling Steam will give the same desired effect but logging out and in again is more efficient and, in most cases, as effective as a fresh install. Hence we recommend that more. Click here to fix Steam missing file privileges error.
See Also : Razer Synapse Not Working in Windows 10
Method #2 Just Reboot Your Computer
Suppose some other applications or processes like the antivirus, disk indexing service, or anything else are accessing some of the files that need to be verified by the VAC. In that case, the VAC service may be denied access by the operating system to avoid read-write conflicts and may lead to VAC being unable to verify the game session error. Just a simple reboot can do the trick for you.
To do that, Click on the Windows icon at the leftmost bottom corner of your screen, on the taskbar, or place the Windows key on your Keyboard, which is generally located at the bottom row alongside the space and Alt keys. 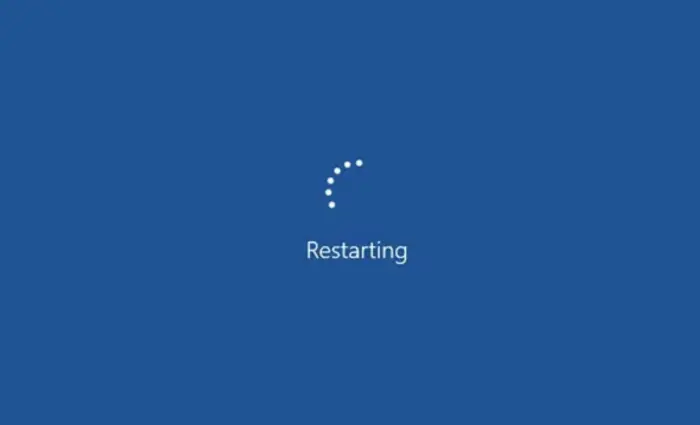
In the Start menu that appears, click on the power button and select reboot. If the operating system asks to close any apps, save data on the apps you were working on and perform the reboot of the system.
Now open your game and see if you can start a game session.
See Also: Delete System Error Memory Dump Files
Method #3 Verify the Integrity Of The Game Files
You can manually check the integrity of the game files installed to verify if they are exactly as they should be, as described by the game manufacturer and the Steam distributors, without any corruption of modified files.
To do that,
- Open Steam using its desktop or the start menu icon.
- Go to the Library tab. You will see installed games on your device there. Right-click on the game you are facing. The VAC could not verify the game session error in and go to properties. In the local tab, click on the Verify integrity of the game files option.
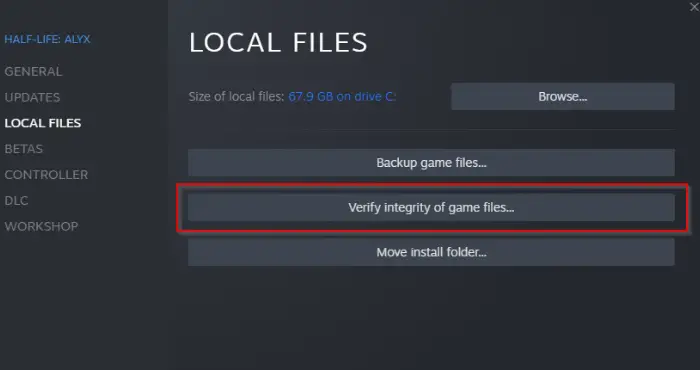
Depending on the game size and your type of storage, along with background activity, this process will take some time. It is better to close any background apps or services unrelated to Steam utilizing system resources like CPU, RAM, or Storage.
Once the check is complete, rerun the game and see if this fixed the issue.
See Also : Fix Svchost.exe High CPU Usage
Method #4 Repair The Steam Client
The steam client itself may have some broken or damaged files. Hence, it may lead to VAC’s inability to verify the game session error.
To fix this,
- Press the key combination Windows + R. Run… dialogue box shall appear. Type cmd in there and open the command prompt.

- In the command prompt, copy and paste “C:\Program Files (x86)\Steam\bin\SteamService.exe /repair” without the included quotes and press enter.
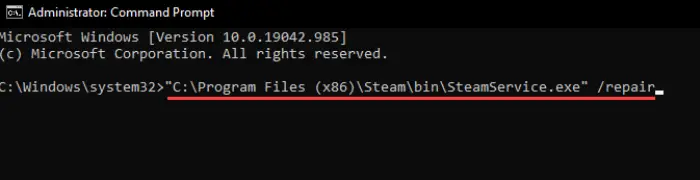
- If the path to the SteamService.exe is different in your system, replace the path with the path of your SteamService.exe.
- Let the repair be complete, and after it is complete, restart your machine.
- After the restart, try to open the Steam app first. It may reconfigure itself or download some files for updates or configuration. Log in if prompted so.
- Open your game and see if this solved the VAC was unable to verify the game session error.
Check Out: Best Data Recovery Software
Method #5 Exclude Game Directory From Antivirus Scan
As mentioned earlier, the antivirus may try to scan the game directory in the background. It may lead to the VAC service being unable to verify the game files. To avoid this issue, you may consider just whitelisting the game and Steam directory such that they are not scanned automatically. This process is different for different anti-virus programs.

Most probably, it is the case of launching your anti-virus software application. And going to settings and adding the game directory in the excluded folders list. How to fix Windows 10 startup menu missing? Click here to learn.
Check Out: How to Fix Dell Laptop Plugged in Not Charging
Method #6 Check The DLL File:
The Program Files folder contains a DLL file for the Steam service. On the PC, it is in Local Disk C. The Steam installation folder contains the latter DLL file. VAC cant verifies The game session if there is a change in these two documents. You must copy specific DLL files to resolve the problem. Swap the second one with it:
- Go to the directory where you downloaded Steam. The way to find it is often C>Program Files (x86)>Steam > Bin.
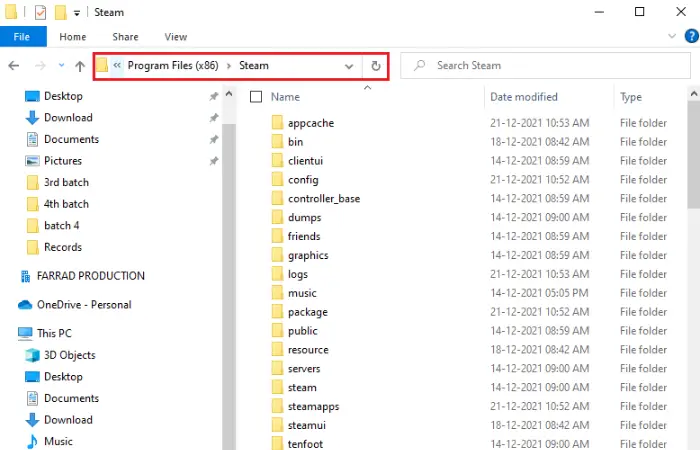
- Copy “St” amservice.dll” by selecting it with the right-click menu.
- Just paste the copied.dll file in the “C>”Program Files (x86)>Common Files> Steam” directory. Choose to replace the file if prompted that it already exists by selecting the “Replace” option.
- Now that the game has been launched, one can verify whether the issue remains.
Method #7 Get Rid Of Temporary Files:
- The ‘VA‘ cannot validate; you can fix the game session error by removing the logfiles that the computer has accumulated over time. The files might be corrupt. Simple actions to take:
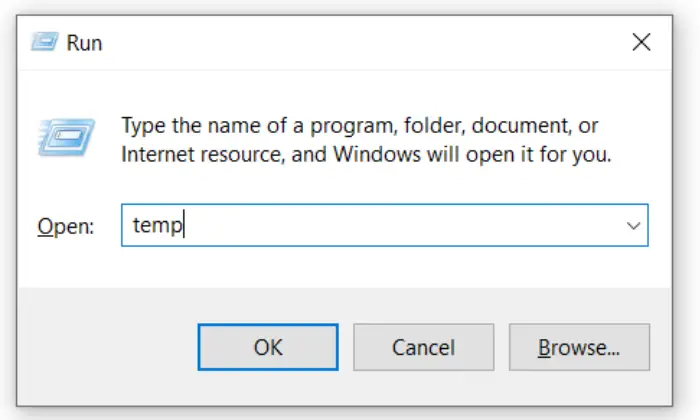
- Holding down the Win key while typing R will display the Run command. Enter the character “temp%” or click the OK button to complete. If prompted, select the Yes button to validate the action after hitting Ctrl + A to select every item in the list, then Shift + Delete to delete them. Read this article for Windows 10 sound problem in Realtek.
FAQs:
What accomplishes game file integrity verification?
A built-in function of Steam allows users to check the game files' integrity. It is typically utilized when issues occur in Steam games due to broken or damaged game files–the data on your computer and those stored on the Steam network, which you can compare. Steam will automatically alter or fix any files that feel like changing after being scanned.
What must I do if VAC won't verify my game?
The mistake could have several causes. VAC could not verify the game session. To see whether they can aid, try the following things: Relaunch the Steam client or log back into your Steam account. Restart the computer. Check the game's files and the drivers for your devices. Utilizing Command Prompt, fix Steam.exe And pause your antivirus software
Since Vac wasn't able to verify, what did that mean?
What did it mean when VAC could not validate your game session? VAC, or the Valve Anti-Cheap System, is a feature in several games, including CS: GO. This notice in CS: GO shows integrity issues with the game files.
See Also: You Must Be An Administrator Running A Console Session SFC
Conclusion
In conclusion, hope that this article helped you get rid of VAC unable to verify the game session error. And now you can play online session games again!

Gravit Sinha: Founder of ValidEdge, a problem-solving website, driven by his lifelong passion for fixing issues.