After the Cumulative Update, several customers experienced issues using VMware Workstation Pro. They have found that installing updates, particularly KB4517211, prevents VMware Workstation from starting. Several solutions to the “VMware Workstation Pro can’t run on Windows” issue are provided below in this guide.

The problem warning VMware Workstation Pro cannot run on Windows may have appeared for some users. Follow the following steps:
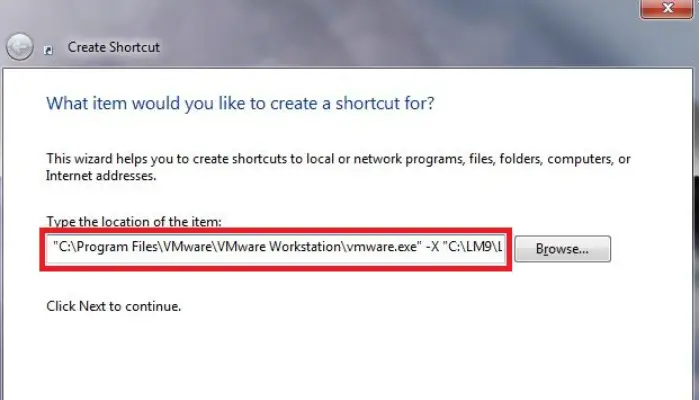
- Navigate to the installation directory for VMware Workstation Pro. It should be located by default in C: Program Files (x86)VMware Workstation.
- Locate the executable file vmware.exe and give it a new name, such as vmwarea.exe.
- Then, restart the device to make the changes effective.
Below is a list of the fixes offered in this tutorial for the VMware Workstation Pro that won’t run on Windows issue. You have four solutions in this article.
How To Get Rid Of The Windows Can’t Run VMware Workstation Pro Pop-Up Message
The VMware Workstation Pro can’t run on Windows, although there are alternative solutions:
Fix 1: Change The Executable’s Name For VMware
Renaming the VMware executable file is one of the simplest ways to overcome the obstacle. You can try it to see whether it works on your end after several people on the associated VMware forums indicated that this solution was successful.
The following steps:
- Navigate to the installation directory for VMware Workstation Pro. It should be located by default in C: Program Files (x86)VMware Workstation.
- Locate the executable file vmware.exe and give it a new name, such as vmwarea.exe.
- Then, restart the device to make the changes effective.
The problem with “VMware Workstation Pro can’t run on Windows” ought to be resolved with this solution. Try the following solution below if the first one doesn’t work. Also, click here to fix if you are failed to connect to Windows Service.
See Also: Fix: The CPU Has Been Disabled By The Guest Operating System Power Off Or Reset The Virtual Machine
Fix 2: Uninstall Windows Updates
As we indicated previously, the VMware Workstation Pro application was inoperable due to several incremental upgrades. Some customers said uninstalling these updates fixed the issue and made VMware Workstation Pro more functional.
Follow these steps to remove these updates:
- Firstly, select Windows Update Settings from the results list after pressing the Windows Key + S and typing “updates” (without quotes).
- Secondly, click the View Update History option in the right-hand pane that you just located.
- There is a list of new updates, including continuous updates and others. Select the Uninstall Updates option at the top of the screen since we need to remove some updates.
- On the Installed Updates page in Control Panel, you can view a list of the continuous updates that have been applied since the feature update.
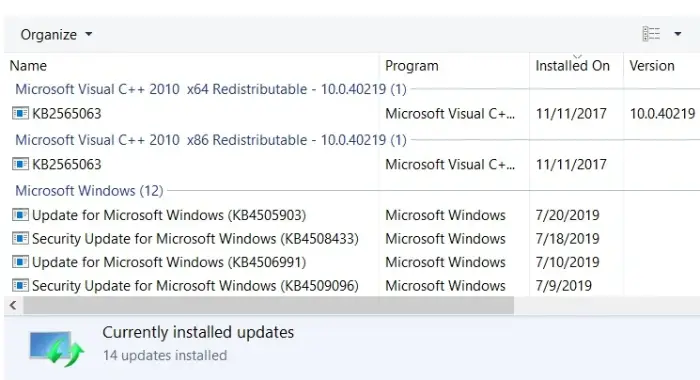
- Then, keep an eye out for the following cumulative updates. Uninstallation can be chosen by clicking on each of the updates. Alternatively, you can select Uninstall: from the context menu when you right-click each upgrades one at a time:
- 2019-10-08—KB4517389 (OS Build 18362.418)
- 2019-10-03—KB4524147 (OS Build 18362.388)
- KB4517211 on September 26, 2019 (OS Build 18362.387)
- You’ll be prompted to restart your Windows computer after deleting the updates. To move forward, click the Restart Now button.
It will resolve the issue with VMware Workstation Pro that can’t run on Windows.
Keep in mind that the updates will eventually still install themselves. It would help if you postponed future updates to prevent this. Click here to fix your Windows license will expire error soon.
See Also: 8 Best Behavior Tracking Apps To Change Your Life
Postponed Future Updates
To do this:
-
- By simultaneously hitting Win + I on your keyboard, you may access the Windows 10 Settings app.
- Then, Click the Advanced Options link under Update & Security > Windows Update.
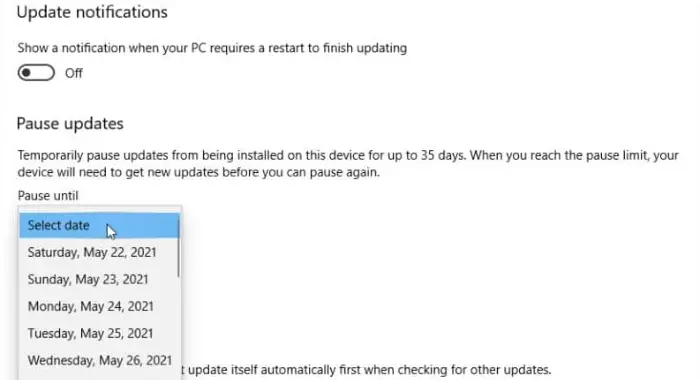
- Select a date from the Pause Until drop-down box in the Pause Updates section by scrolling down to that area. Take note that you may halt updates momentarily for up to 35 days. You must then install the most recent updates before you can resume them.
Here’s the problem, though. The answer to your query, “Will VMware run on Windows 10?” is yes. All you have to do is keep sending pertinent updates. Because of this, this approach only provides a short-term cure for the VMware Workstation Pro can’t run on Windows issue.
See Also: EaseUS Data Recovery Wizard Review, Specs & Pricing
Fix 3: Download Windows ADK
- Visit the Windows ADK Download and Installation page on the official Microsoft website. According to several customers, the “VMware Workstation Pro can’t run on Windows” issue (Assessment and Deployment Kit) was fixed using Windows ADK. Here is the complete manual:
- Locate and download the appropriate version for your Windows 10 version.
- WLocatethe adksetup.exe file in your download directory. When the download is finished
- Then, choose the “Install Windows Assessment and Deployment Kit-Windows 10 to this PC” option.
- To accept the licensing agreement, click Next and select Accept.
- Make sure to choose Application Compatibility Tools, which includes the Standard User Analyzer (SUA) and Compatibility Administrator options.
- To continue, click Install.
- After patiently waiting for the installation to finish, click Close.
- After that, enter “Compatibility” (without the quotes) in the search box using the Windows Key + S combo.
- Then, select Administrator for Compatibility.
- You can access the system database on the subsequent pane containing programs, compatibility solutions, and compatibility modes.
- Locate and choose VMware Workstation Pro under the System Database in the Applications menu.
- You’ll see the vmware.exe entry in the right pane.—Disableentry by right-clicking on it.
- Exit the window.
Windows 10 version 1903 should run VMware Workstation Pro without encountering “VMware Workstation Pro can’t run on Windows” errors. Read this article to fix if your Windows key is not working.
See Also: We Couldn’t Install Some Updates Because The PC Was Turned Off
Fix 4: Uninstall VMware Workstation Pro
According to VMware Workstation Pro developers, customers running Workstation 15.0 can fix the problem by updating for free to the most recent Workstation 15.5 version; users of earlier Workstation versions must first remove the program before upgrading.
There’s a catch, though. The typical procedure for uninstalling Workstation Pro in Control Panel doesn’t appear to function as intended.
The “Uninstall” option was reported by some users to be greyed out. Others complained that the pop-up notice appeared even after removing the software.
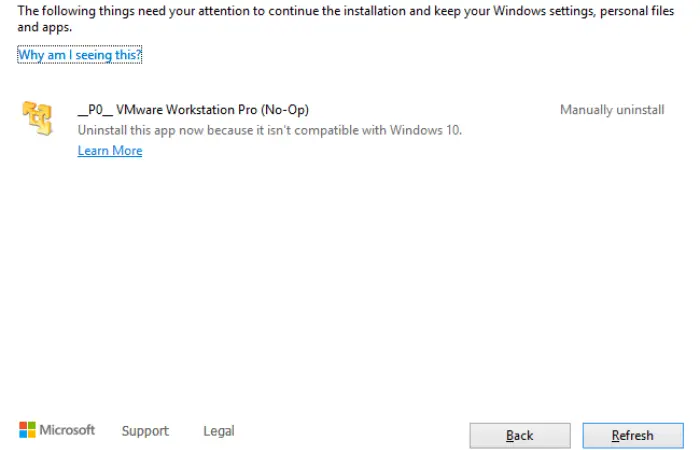
It occurs as a result of some leftover files from the software uninstall. But there’s no need to freak out. The sections below look at a few remedies for the “VMware Workstation Pro can’t run on Windows” error and how to thoroughly uninstall the VMware Workstation Pro program. Bluetooth Not Detecting Devices On Windows 10? Read This.
Method 1: Using The VMware Workstation Pro Software Installer
Most programs have an uninstaller that you may use to delete from your computer if you decide they are no longer helpful.
If you don’t already have a copy, go to the leading VMware site and download the Workstation installer. When you get the file, adhere to the instructions below:
- Access the Windows host system with administrative privileges or as a member of the local Administrators group. The domain account used to log in must be a local administrator.
- Click the Next button after double-clicking the VMware-workstation-(1234).exe file, where 1234 is the version and model number.
- Then, choose Remove from the menu. Check the relevant boxes to save your software license and configuration data.
- To start the Workstation Pro software removal, click the Next option.
See Also: Top 2 Ways On How To Remove Compatibility Mode In Excel
Method 2: Using Command Prompt
Users are running Workstation 5. x This workaround covers later versions
- Start a command prompt from a higher level. To achieve this, hit Win + S to bring up the search box, put “CMD” (without the quotes), then, in the right pane, click the Run as Administrator option.
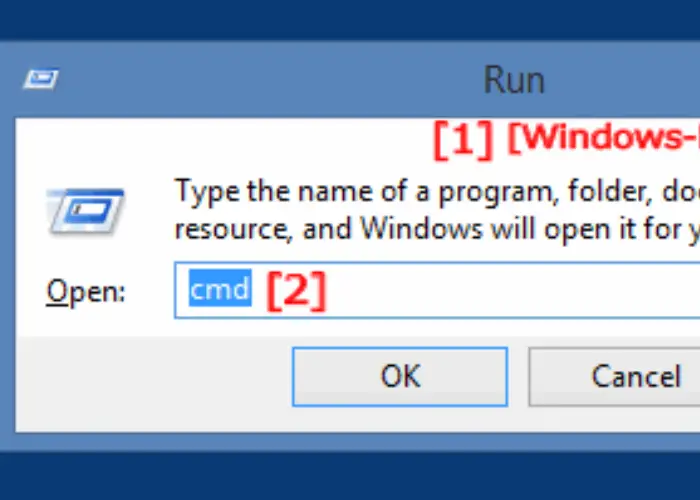
- Then, enter VMware-workstation-5.0.0-13124.exe /c in the Command Prompt window that appears.By doing this, your Windows 10 computer will immediately delete the MSI registration data for the Workstation application. Want to fix Windows 10 100% Disk Usage in Task Manager? Read This.
Method 3: Utilizing A Third-Party App
If you find the abovementioned procedures tedious, we advise using a dependable third-party program like Auslogics BoostSpeed.
The program has several features aimed at enhancing PC performance. You can use one of these features to uninstall programs you usually can’t delete forcibly.

Install Auslogics BoostSpeed, then select the Clean-Up tab. Click the “Force-uninstall applications” button to see the Uninstall Manager pane, which lists all the installed apps on your computer.
Find the problematic program in the list, select it, and then press the Uninstall icon.
The above procedures help resolve the issue: “VMware Workstation Pro can’t run on Windows.”
See Also: Fix Windows Update Error 0x80070005
FAQs
What is VMware Workstation for Windows 10?
You can run Linux, Windows, and BSD operating systems in a virtual environment inside of Windows using VMware Workstation. Numerous guest operating systems are supported, including Windows XP through Solaris, openSUSE, Windows 10, RedHat, and other Linux versions, numbering in the hundreds.
How come VMware Workstation Pro won't run?
They have found that the inability of VMware Workstation to launch was brought on by the installation of updates, namely KB4517211. VMware Workstation Pro can't run on Windows, reads the notice displayed when the program attempts to launch.
How can we enable VMWare Workstation Pro's VmPlayer?
Right-click vmplayer.exe and select Enable entry from the context menu under Search > Compatibility Administrator (run as administrator) > System Database (xx-bit) > Applications > VMware Workstation Pro. (run vmplayer.exe twice)
How to uninstall VMware Workstation 12?
1. Choose Command Prompt (Admin) from the context menu when you right-click your start button. 2. At the command prompt, type control appwiz.cpl. 3. The old-fashioned uninstall box should appear; choose VMWare Player from the list, then click Change at the top. 4. Choose Uninstall from the pop-up box.
Conclusion
In conclusion, we sincerely hope the material helped you to solve the VMware Workstation Pro can’t run on Windows problem. Above all, the top four fixes are all discussed in the post, allowing you to select the most acceptable method and resolve the issue.
This article also addresses some frequently asked questions regarding VMware that can’t run on Windows. Also, click here to fix the Windows 10 Slow Shutdown problem.

Mauro Huculak: Technical writer specializing in Windows 10 and related technologies. Microsoft MVP with extensive IT background and certifications.