Windows 10, these days, is going through lots of updates. Along with the updates come several installation errors. And here we are to discuss and suggest the solutions to Windows modules Installer worker. When your computer installs updates or performs maintenance tasks, it may use a lot of disk and CPU storage. This may cause the Windows Modules Installer Worker in Windows 10 to stop working.
Turn off the automatic restart to diagnose and fix the issue. If the “Windows Modules Installer Worker” process uses a lot of CPU power, it means that Windows is busy installing updates or performing maintenance tasks. Wait for the tasks to finish, and the CPU usage should return to normal.

The reason behind this High CPU usage is not known precisely, but some standard errors are viruses and malware, old version drivers, or corrupted files. It leads to bad performance of the system and problems in Updates.
How to Fix Windows Modules Installer Worker High CPU Usage
Some of the best fixes that can be applied to the issue are stated below.
Method 1: Use of Windows Update Troubleshooter
Solution to Windows Modules Installer Worker! It is the primary step towards solving the Windows Modules Installer Worker High CPU occupying error. Troubleshooting isn’t practical at an excellent level but can fix the issues at the ground level. The steps to run the troubleshooter are written below.
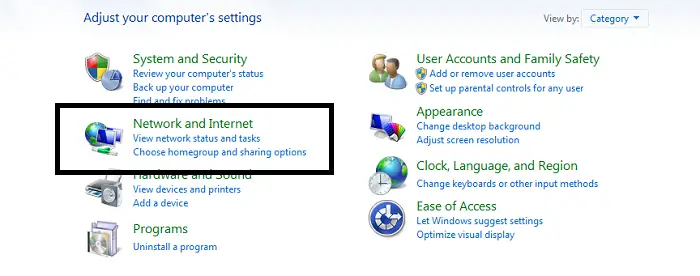
1. First, Go to the Start Menu.
2. Then type Control Panel in the Search Field.

3. Afterward, from the opened windows, search for Troubleshooting.
4. Then Click on it to open the troubleshooter. 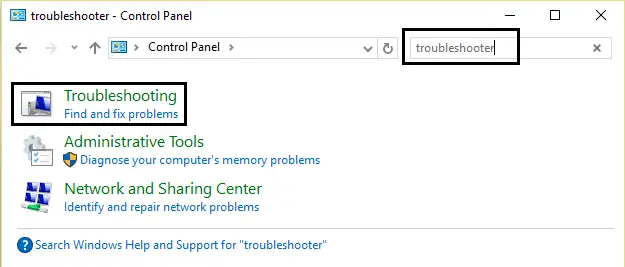
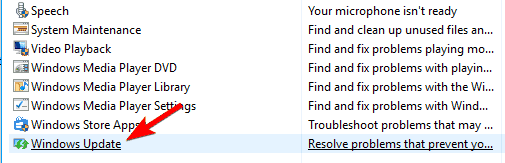
5. On the left panel of the opened window, Click on View All.
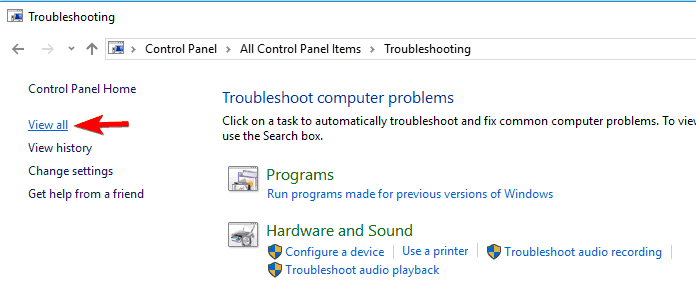
6. Select Windows Update and follow the instructions as prompted on the screen.
7. Wait for the troubleshooting to be terminated.
Start the installation again and open the Task Manager to see if the CPU usage is lowered. If not, then read other methods.
You may also like –
- 10 Ways to Fix Steam Disk Write Error in Windows 10
- [Solved] How to Stop Skype from Starting Automatically
- 10 Ways to Fix Video Scheduler Internal Error in Windows 10
Method 2: Setting Windows in Manual Mode
Solution to Windows Modules Installer Worker! The updates and installation are automatic by default. Setting the Windows Modules Installer Worker can resolve the problem of High CPU. The steps to be followed are lined below:
1. Press the Windows Key and R buttons simultaneously to open the Run box.
2. Then, Type services.msc and click OK.
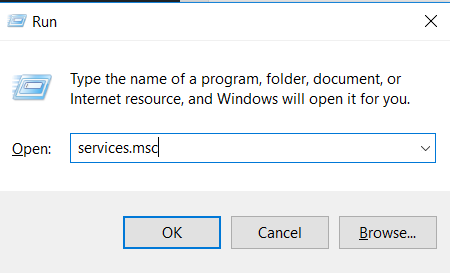
3. Afterward, from the opened window, Search for Windows Modules Installer.
4. Then Double Click on it.
5. A property window will open.
6. Afterward, set the Startup Type to Manual.
7. Then click OK to apply the changes made.

8. The CPU usage through this shall return to its standard window. If not, stop Windows 10 Updates.
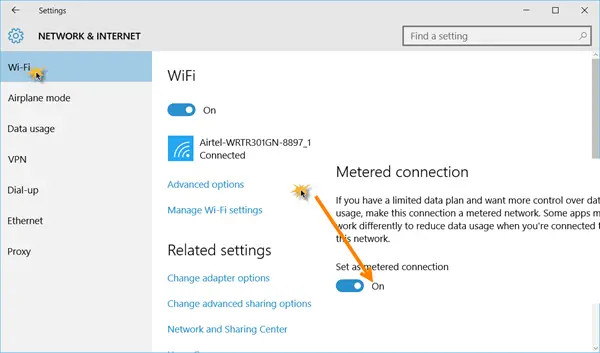
Solution to Windows Modules Installer Worker! If using WiFi:
1. First, Go to the Start menu.
2. Then Click on Settings and open Network & Internet.
3. Go to Wifi Settings and Click on the Advanced Options tab.
4. Afterward, tick on Set as metered connection.
If using Ethernet:
1. Press the Windows Key and R buttons simultaneously to open the Run box.
2. Then Type regedit and click OK.

3. Afterward, click Yes when the User Access Prompt opens.
4. It will help your system Registry Editor.
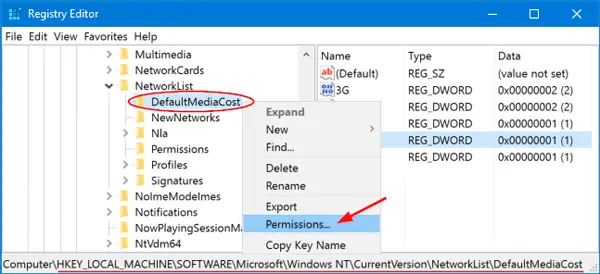
5. Then Go to
HKEY_LOCAL_MACHINE > SOFTWARE > Microsoft > Windows NT > CurrentVersion > NetworkList > DefaultMediaCost

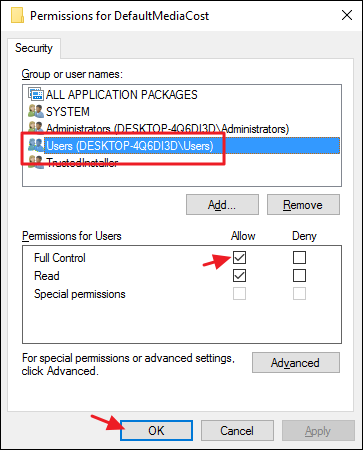
6. Afterward, right-click on the DefaultMediaCost and select Permissions.
7. Then Click on Add.
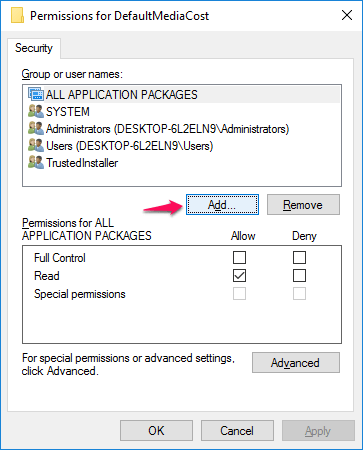
8. Afterward, enter your User Name into the Object Names to select and Click Check Names.
9. Then click OK.

10. Then Click on the user you just added.
11. Afterward, check the box labeled Allow for Full Control.
12. Then Click OK.
13. Afterward, double-click on Ethernet.
14. Then, Set its Value Data to 2 and Click OK.

15. Then close the Window.
16. Finally, reboot your System.
Check the task manager and restart the installation to see the CPU usage.
See Also:
3 Ways to Fix SIM Not Provisioned MM#2 Error
{Solved} 5 Ways to Fix Windows Update Error 0x80070002
10 Ways to Fix Windows 10 Update Error Code 0x8024a105
Method 3: Remove the Software Distribution Folder to refresh Windows Update
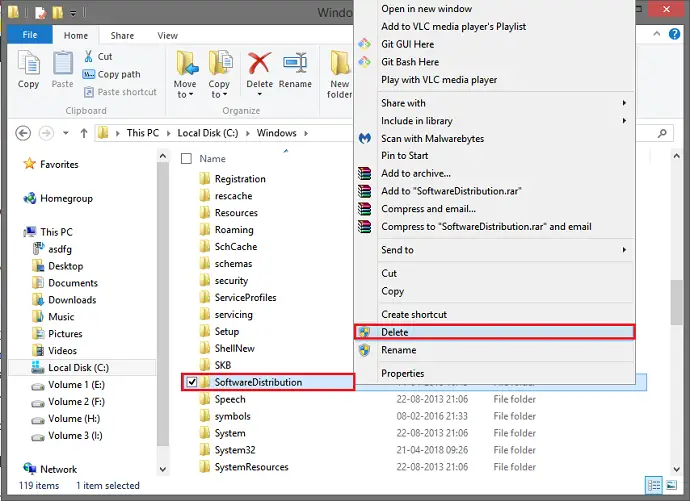
Solution to Windows Modules Installer Worker! Whenever Windows prompts for a new update, the files are stored in the Software Distribution Folder if any files are corrupted.
1. First, Go to My PC.
2. Then open Local Disk C.
3. Then Open the Windows Folder.

4. Afterward, search for the Software Distribution Folder.
5. Then remove the selected folder.
Now try updating Windows 10 again and see if Windows Modules Installer Worker is processing at low CPU usage.
Method 4: Restart Windows Update Service
Solution to Windows Modules Installer Worker! The steps to restart the Windows Update Service are given below:
1. Press the Windows Key and R buttons simultaneously to open the Run box. 
2. Then, Type services.msc and click OK.
3. Then search for Windows Update and right-click on it.
4. Afterward, select the Restart Option.

I hope this fixes the Windows Modules Installer Worker High CPU usage problem.
Don’t miss out –
- {Solved} 6 Ways to Fix BAD_POOL_CALLER BSOD Error
- 11 Ways to Fix Com Surrogate has Stopped Working
- {Solved} 7 Ways to Fix Steam Won’t Open Error
Method 5: Find and fix the corrupted files using the DISM tool
Solution to Windows Modules Installer Worker! The steps to be followed are given below:
1. First, Go to the Start Menu.
2. Then type cmd in the Search bar.
3. Now, Open the Command Prompt and Run As Administrator. 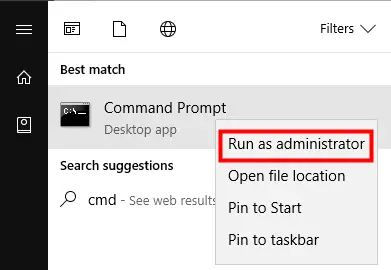
4. Afterward, type the given below command and press Enter.
Dism.exe /Online /Cleanup-Image /Restorehealth 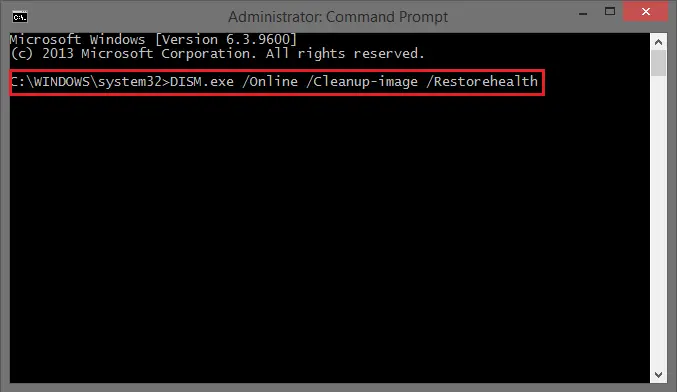
5. The DISM tool will scan the problem and resolve the issue.
6. Finally, restart your system. 
See Also:
- 3 Ways to Fix Whea Uncorrectable Error in Windows 10
- 5 Ways to Fix IAStorDataSvc High CPU Usage Error
Method 6: Update your Device Drivers
The old and incompatible drivers on your system can lead to issues like Windows Modules Installer Worker High CPU usage. As one of the fixes to the problem, try updating the drivers.
1. First, Download and install third-party software Driver Easy.
2. Then, Run Driver Easy and click the Scan Now button.

3. Afterward, this will scan the drivers and find the problematic drivers on your system.
4. Then Click the Update button but labeled before scanned device drivers.
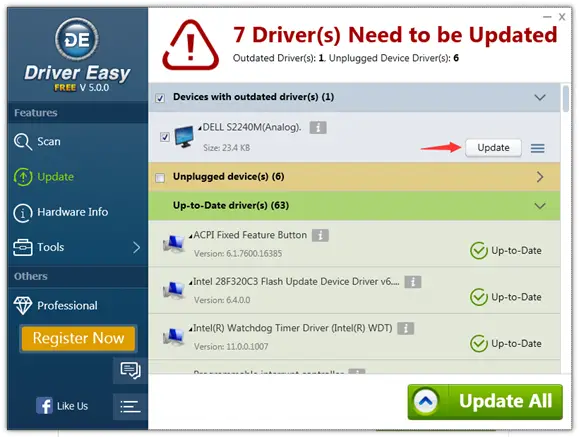
5. Finally, reboot your Computer.
See Also:
- Fix Windows Could Not Automatically Detect Network’s Proxy Settings
- 10 Ways to Fix Windows 10 File Explorer Won’t Open
- {Solved} 6 Ways to Fix Network Adapter Missing Issue
- 10 Ways to Fix System Service Exception Error in Windows 10
FAQ’s
How do I fix the windows modules installer worker high CPU usage?
Method 1. Remove the SoftwareDistribution folder. Method 2. Restart the Windows Update Service. Method 3. Use the Windows Update Troubleshooter. Method 4. Run the System File Checker (SFC scan) Method 5. Use the DISM command.
How to stop the windows modules installer worker?
Windows modules installer allows your PC to automatically install critical security updates, so it should always be switched on.
Why is the windows modules installer worker always running?
Windows Modules Installer Worker(TiWorker.exe) is a Windows Update Service that looks for new updates and installs them to your computer. In other words, when your computer's system is checking for Windows updates or installing any update, this process will be running automatically
Conclusion
In conclusion, These were some of the best ways to Fix Windows Modules Installer Worker High CPU usage for the entire Windows 10 user. I hope this article was helpful to the user and they could apply the fix to their system.

Gravit Sinha: Founder of ValidEdge, a problem-solving website, driven by his lifelong passion for fixing issues.