What is Windows Search Microsoft search filter host? Is it secure, and how can we resolve the Microsoft Windows search filter hosts high CPU issue? We have provided you with three solutions to the problem in this post.
If you’re experiencing issues with the search bar in Windows 10, don’t worry. You can easily troubleshoot the problem by following a few simple steps. First, open the Start menu and navigate to Settings > Update and Security > Troubleshoot > Search and Indexing. Then, click the “Run the troubleshooter” button to run the diagnostics and identify the source of the problem.

When you opened Task Manager, you may have noticed that the SearchFilterHost.exe service used much CPU power on your Windows PC. You should know what this process is and whether a virus could be to blame for the significant CPU consumption. It is an executable file that aids in Windows Search’s smooth operation. As a result, in this article, we’ll explain in detail how to resolve the Microsoft Windows search filter hosts high CPU consumption problem on your computer.
See Also: How To Fix Windows 10 Startup Menu Missing?
What Is Meant By Microsoft Windows Search Filter Host?
A piece of software that is part of Microsoft Windows is the Microsoft Windows Search Filter Host. It is a part of Windows Search Indexer, a service specifically for searching and indexing data on Windows PCs.
A Windows program called Search Indexer is used to index and cache files on Windows PCs. Users may quickly identify files with it, and the Control Panel can be used to change its settings. Users can filter the results returned by the Search Indexer with the aid of the Search Filter Host.

The executable file for Microsoft Windows Search Filter Host is called SearchFilterHost.exe, and it may be found in the C:WindowsSystem32 directory.
Microsoft Windows Search Filter Host is generally a trustworthy Windows file that does not harm your computer.
However, many customers wonder how CPU-intensive Microsoft Windows Search Filter Host is. Know more about what is Microsoft Windows Search Filter Host. If you also have this issue, try the following solutions. So this is what is Microsoft Windows search filter hosts.
See Also: Fix Microsoft Word Background Installation Ran Into A Problem
Causes of Windows Search Filter Host Errors
The leading causes of the serachfilterhost issues are infections with malware or viruses. • The virus’s ability to corrupt host files for search filters, Windows OS files, or programs is another cause of these issues.
- Incomplete Windows operating system installation

- Corrupt Windows Registry Keys linked to the Windows OS or searchfilterhost.exe.
- A different program is incompatible with the Windows operating system.
How to Fix High CPU for Microsoft Windows Search Filter
These are a few solutions for the Microsoft Windows search filter that hosts high CPU issues.
Terminate the process and turn off Windows Search Service
When you search for anything, it’s okay if Microsoft Windows Search Filter Host uses a lot of CPU power since the indexing service is now working very hard to acquire data and rebuild the search index. Know what to do if your Microsoft teams keep uninstalling again and again.
However, if the Microsoft Windows Search Filter Host high CPU issue arises for no apparent cause, you can terminate this process and turn off the Windows Search service.
The guide on how to finish this process is provided here:
- Right-click on the taskbar’s space.

2. Pick Task Manager from the options. 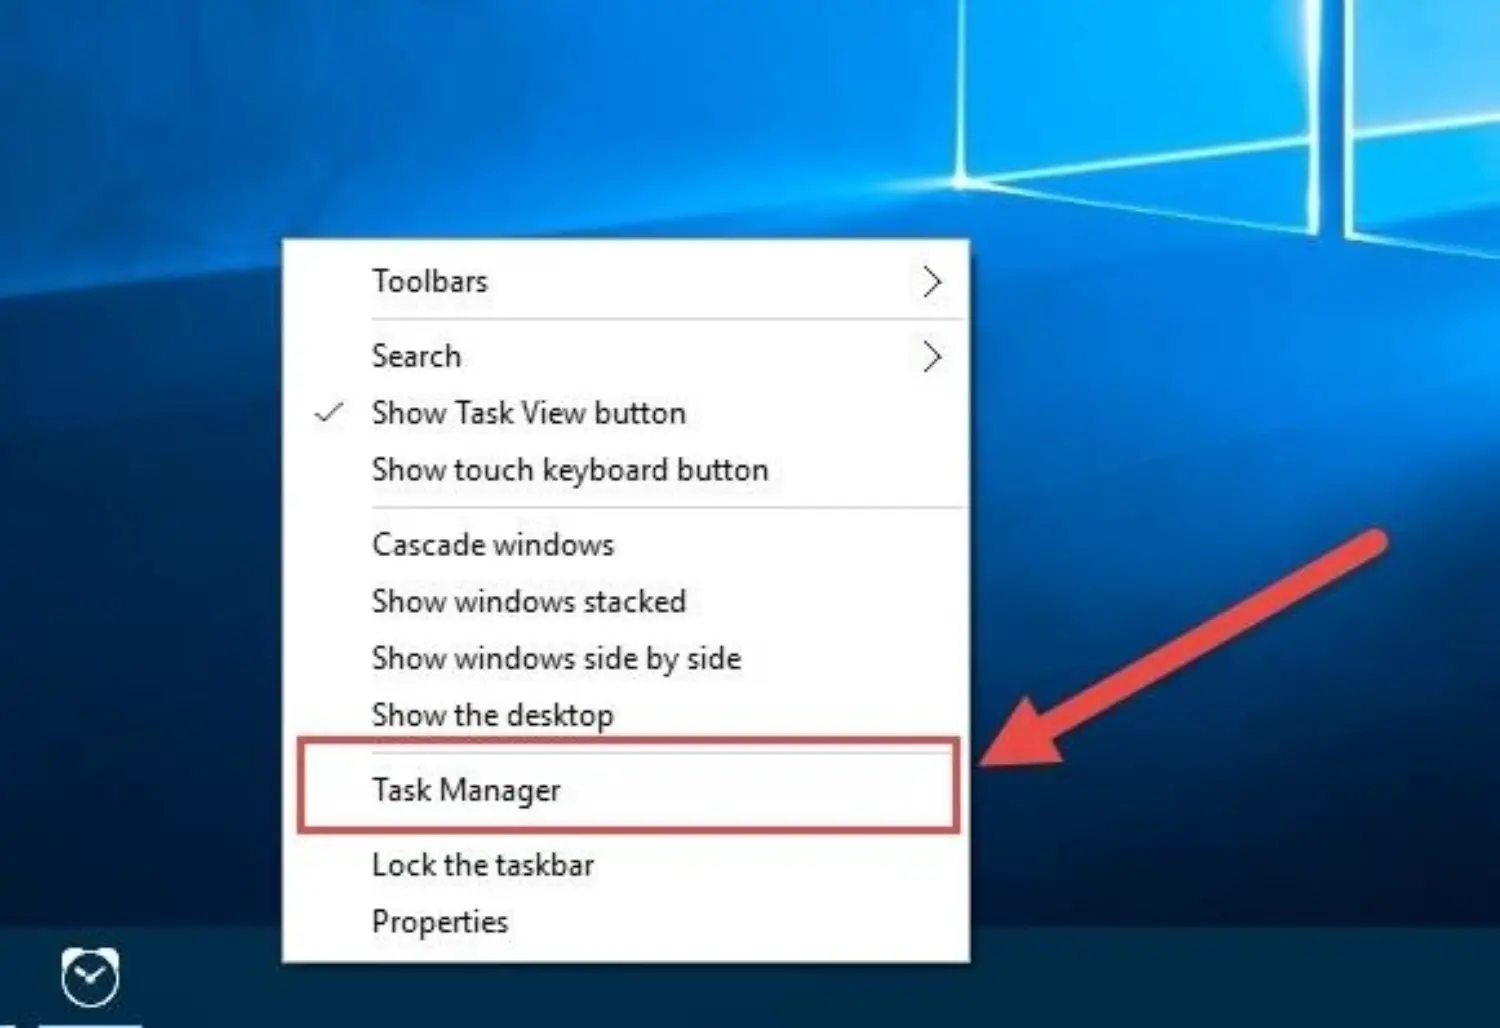
3. Find this process under the Processes tab, right-click, and choose End task. 
Here is a guide on how to turn off Windows Search:
- To say “Run,” use the “Windows + R” keys.
2. Type “msc” into the box, then click Enter.
3. Locate the Windows search service by scrolling down in the Services panel, then right-click.
4. Select Property.
5. Expand the Startup type in the new window and select Disabled.
6. Select OK
Use Indexer Troubleshooter
The host of the Microsoft Windows Search Filter is a component of the Windows search and indexer. You may run the indexer troubleshooter to resolve difficulties with Microsoft Windows Search Filter Host. The guide may be found here:
- Open Settings by pressing the “Windows + X” keys.


2. Select “Run the indexer troubleshooter to resolve common search issues” from the drop-down menu under Search > Searching Windows.
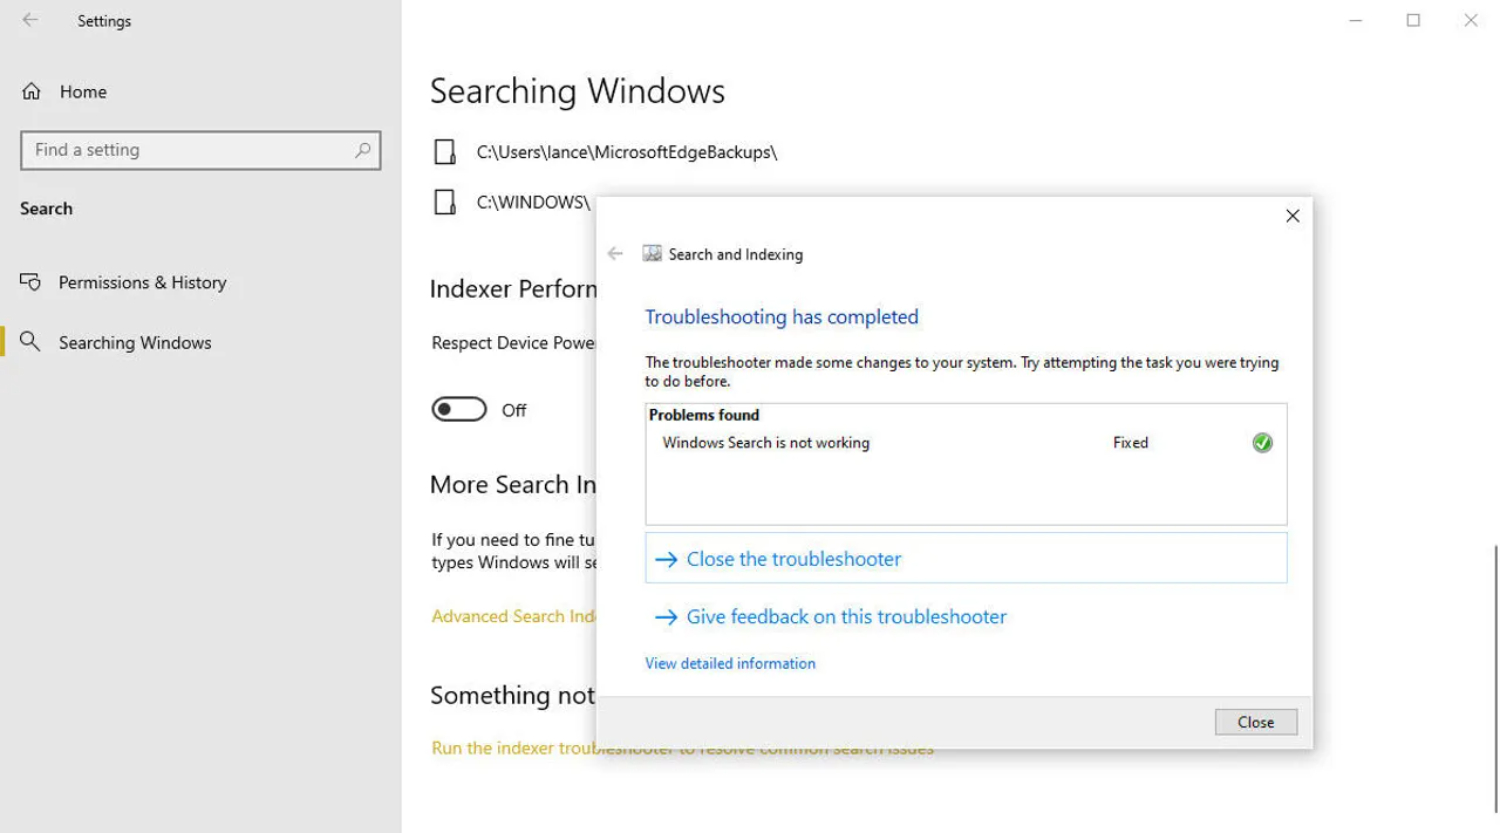
3. Selecting “Search or indexing is slowing down the computer” will allow you to continue by clicking Next. Once the Troubleshooter has identified and fixed the issues, wait until your computer has rebooted.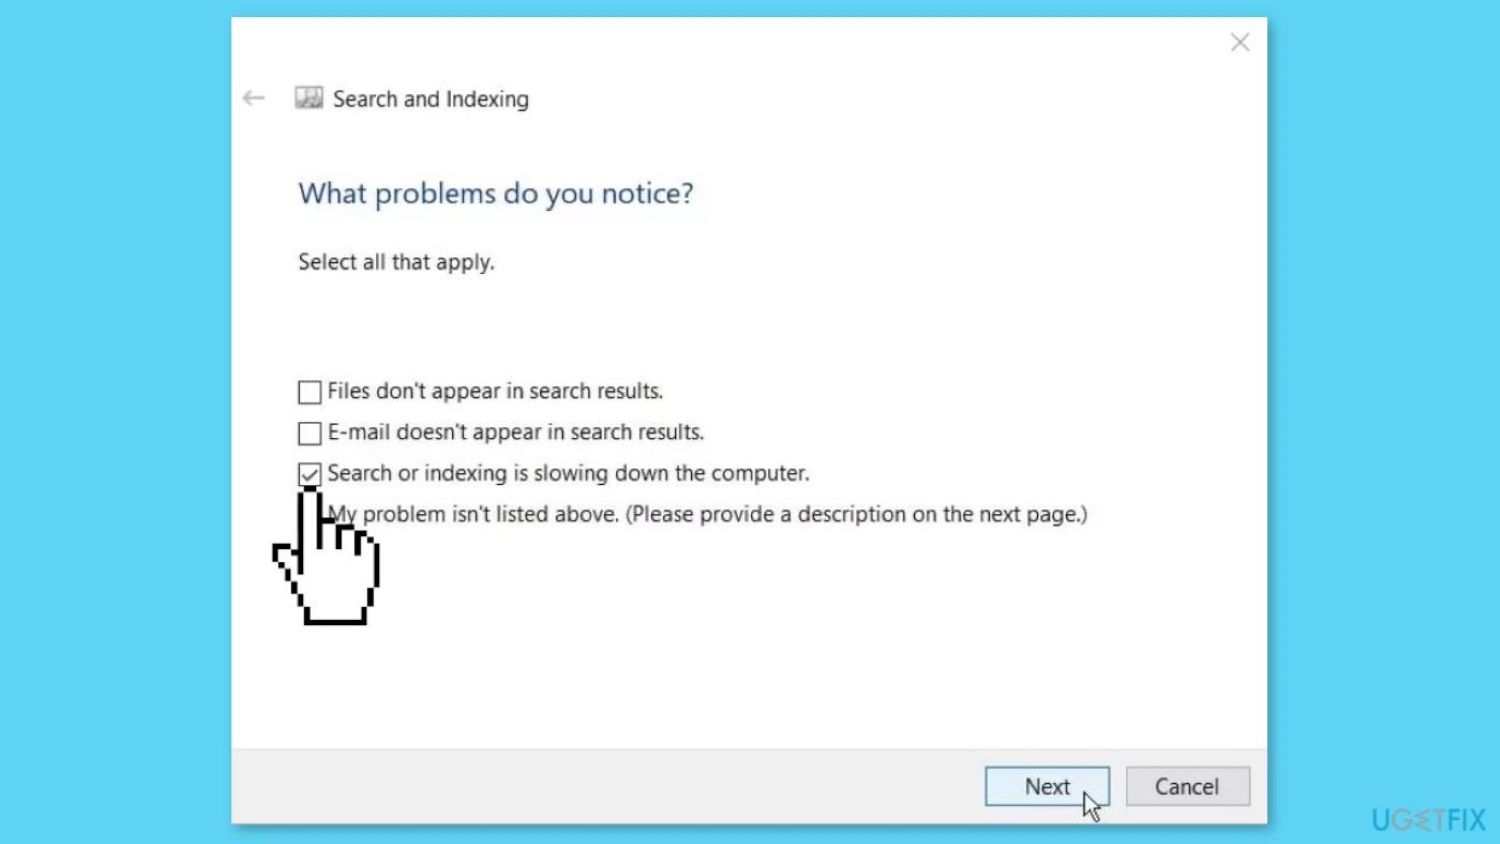
Tip: The Search button in Settings may only be present in some builds. You may discover Search and Indexing by going to Update & Security > Troubleshoot and scrolling down. Check the box next to “Search or indexing is slowing down the computer” to run this Troubleshooter.
If Microsoft News on the taskbar is no longer needed or is causing some trouble, Click Here.
See Also: 4 Ways To Fix Svchost.Exe High CPU Usage (Netsvcs)
Update the Search Index
You can attempt recreating the Windows Search service if you don’t want to deactivate it. Here is the instruction:
- Open the Control Panel and ensure that Icons are selected.

- Select Options for Indexing.
- Click Modify, uncheck everything except the OS (C) drive, and click OK.
- Under Troubleshooting, hit the Rebuild button after clicking the Advanced button.
- The warning “Rebuilding the index might take a long time to complete” will appear. Only after reconstruction is complete particular views and search results may be lacking.
- After selecting OK, wait till the rebuilding is finished.
So this is how one can resolve Microsoft Windows search filter hosts high CPU issues.
See Also: Fix Microsoft Compatibility Telemetry High Disk Usage
FAQs
What is a host for the Microsoft Windows Search Filter?
A piece of software that is part of Microsoft Windows is the Microsoft Windows Search Filter Host. It is a part of Windows Search Indexer, a service specifically for searching and indexing data on Windows PCs. A Windows program called Search Indexer is used to index and cache files on Windows PCs. Users may quickly identify files.
How do I disable the host for Microsoft Windows Search Protocol?
To open the Services console, press Win + R and enter services.msc, then press Enter. Look for the Windows Search service, right-click on it, and then choose Properties. Change the Startup type to Disabled after selecting the Stop button under the Service status section of the Properties window.
Can I turn off Windows Search?
You can disable Windows Search. Initially, press Windows + R. services.msc, then hit Enter. To access Windows Search, scroll down. When you right-click on it, choose Properties. Put Disabled as the Startup type. And finally, click Stop.
Can I turn off the host for Microsoft Windows Search Filter?
Yes, you can by typing MSC into the box, then click Enter. Locate the Windows search service by scrolling down in the Services panel, then right-click. Decide on Properties. Expand the Startup type in the new box and select Disabled.
What should I do when my disc space is 100?
Checking for viruses, clearing your virtual memory, doing a clean boot, or erasing your hard drive could reduce disc consumption if it reaches 100%. A straightforward restart could solve the problem.
How can I modify the settings for my filter key?
Double-click Accessibility Options in the Control Panel. The Use Shortcut check box is selected by clicking the Keyboard tab and clicking Settings in the FilterKeys section. Click OK one more after the first click.
Conclusion
That is all there is to know about resolving the high CPU utilization issue with Microsoft Windows Search Filter Host on your Windows computer. We hope that this post has assisted you in determining the Microsoft Windows search filter hosts high CPU issues.
See Also: How To Fix Microsoft Error Code 0xc1900208

Gravit Sinha: Founder of ValidEdge, a problem-solving website, driven by his lifelong passion for fixing issues.