The Windows Update error code 0x80070057 indicates a failure during the update of Windows. Reasons for this can be corrupt Windows update components and previously failed updates that have caused corruption. This corruption occurs in system files needed to pack and unpack update packages.
This error occurs for many reasons, including storage devices and corrupted system reservation problems. Try to fix this error by changing the registry and see if it resolves. Press the Windows key + R key simultaneously to open the Run window, then enter [regedit] and press the [OK] button.

The error usually follows this message: There were some problems installing updates, but we’ll try again later. If you keep seeing this and want to search the web or contact support for information, this may help – (0x80070057). Keep reading this article for a detailed step-by-step guide to understanding this problem.
Cause Of Windows Update Error 0x80070057
Windows Update error 0x80070057 can occur for some reason. There are several typical causes, as follows:
Windows Update error 0x80070057 can occur for some reason. There are several typical causes: Incorrectly configured system settings, Corrupted or missing system files, Conflicting software or drivers, Antivirus software blocking the update, and more. Error 0x80070057 is a standard error code that occurs when Windows Update is done, installs a new application, or upgrades to Windows 10. It indicates corrupt system files, insufficient disk space, or an incompatible file system on your storage device.
- Incorrectly configured system settings
- Corrupted or missing system files
- Conflicting software or drivers
- Antivirus software blocking the update
- Insufficient disk space
- Issues with the Windows Update service
- Issues with the computer’s internet connection
- Conflicts with other software or system files
It’s recommended to check the Microsoft website for troubleshooting steps and the Windows event viewer for more information on the error.
Specific software that causes the error or services running on the computer. In this case, try disabling or uninstalling the software and see if the error persists.
If the issue persists, contact Microsoft Support or a qualified technician.
How To Fix Windows Update Error 0x80070057
Here several methods are listed which will help you in solving the error.
Update Troubleshooter
You can run the update troubleshooter for any error that hinders Windows update. To run the troubleshooter, follow the steps below:
1. Simultaneously, press the Windows and I keys on the keyboard.
2. Then navigate to Change PC Settings -> Update and Security -> Troubleshoot -> Windows Update.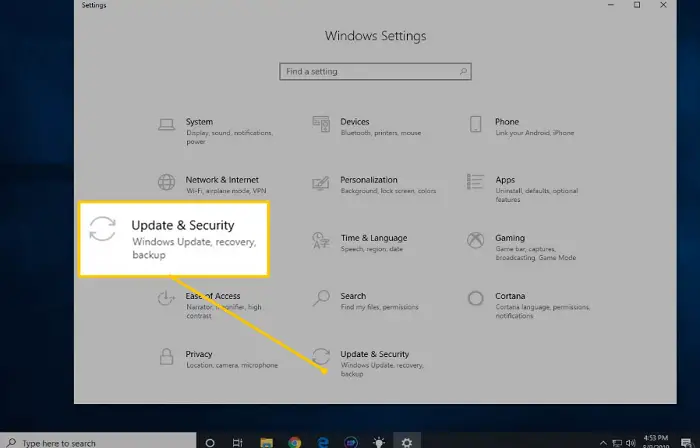
3. Afterwards, follow the instructions given on the screen.
After this, try to rerun the Windows Update. See if you still receive the 0x80070057 error.
Check the Hard Disk drive (HDD)
The Windows Update error 0x80070057 can occur due to a faulty HDD. Check if your HDD has a bad sector. You can do this in two ways:
Option 1: Using the Desktop
1. At First, click the Start button. Type in cmd. Press Enter.
2. The Command Prompt window opens. In the window, then type in chkdsk /r. Press Enter key and let the process move to completion.
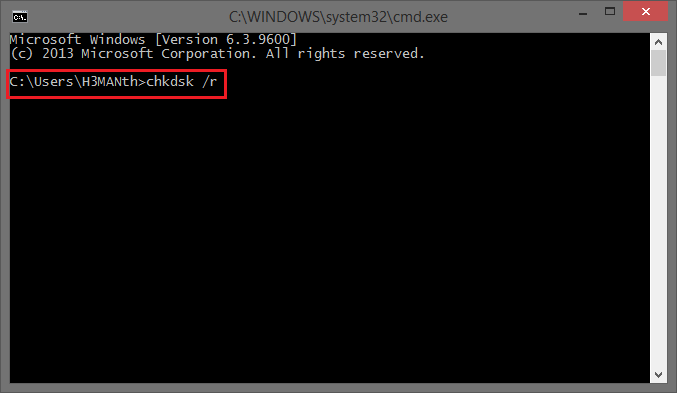
3. In your report, you can see if you have lousy sector space. If you do, replace your Hard disk drive.
Check Out: 3 Ways to Fix ERR_NAME_RESOLUTION_FAILED Error
Option 2: Use the Windows Installation CD/DVD or USB
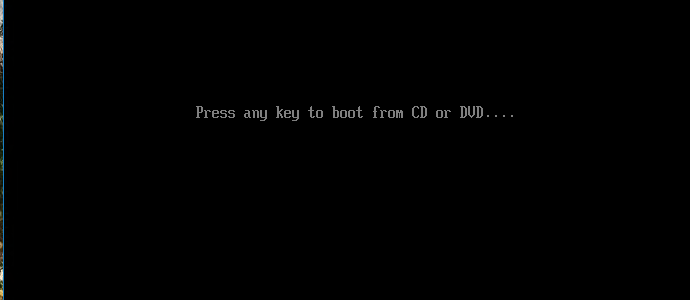
1. First, insert your Windows Installation CD/DVD or USB.
2. A message will appear on the screen Press any key to boot from a CD or DVD. Follow this instruction and press any key.
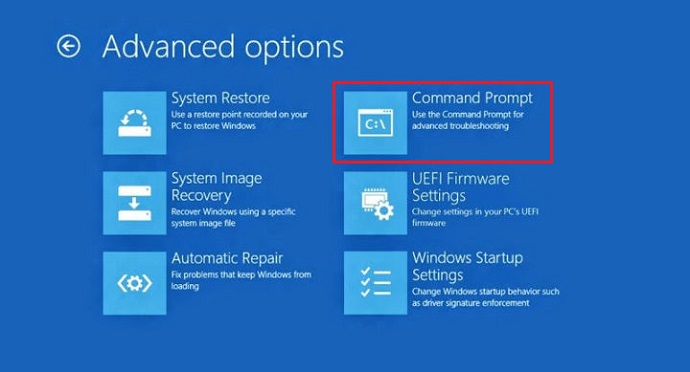
3. Then select your time, language, and keyboard. Then click on Next. Afterward, click Repair your computer.
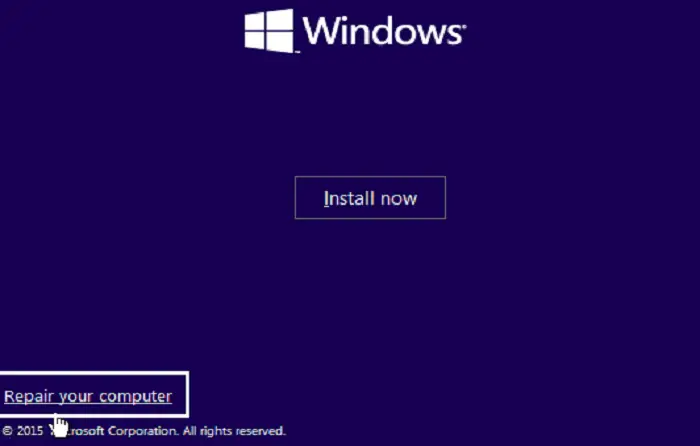
5. Then click on Troubleshoot -> Advanced Option -> Command Prompt.
6. Inside the command prompt window, type in chkdsk /r. Afterward, press the Enter key, and wait until the process completion.
7. If there are any bad sectors, you will see them in the error report. Consider replacing your HDD, then.
Delete Software Distribution and run DISM command with sfc /scannow command
The error 0x80070057 can be caused due to damaged or missing Windows Update files. You can download the updates again and scan for data errors.
First, to delete Software Distribution, follow these steps:
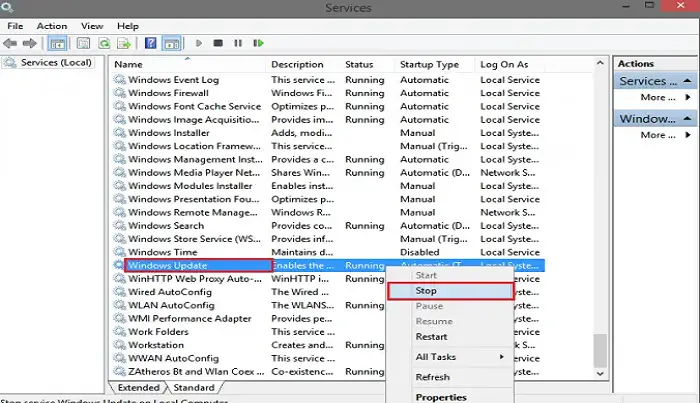
1. At First, click the Start button. Type of services and Run it as administrator.

2. The services window will pop up. Then look for the Windows Update service.
3. When you locate it, right-click on it and select stop. Be careful not to close the window right away.
4. Afterward, navigate to C:\Windows\SoftwareDistribution\download
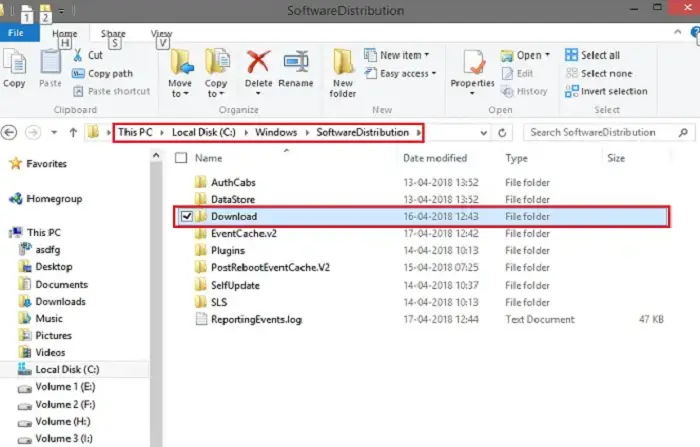
5. Afterward, press Ctrl + A. This will select all the files. Now right-click on the highlighted files. Select Delete. Wait for all the files to be deleted.
See Also: 5 Ways To Delete System Error Memory Dump Files
6. Then go back to the services window. Look for the Windows Update service. Right-click on it and select Start.
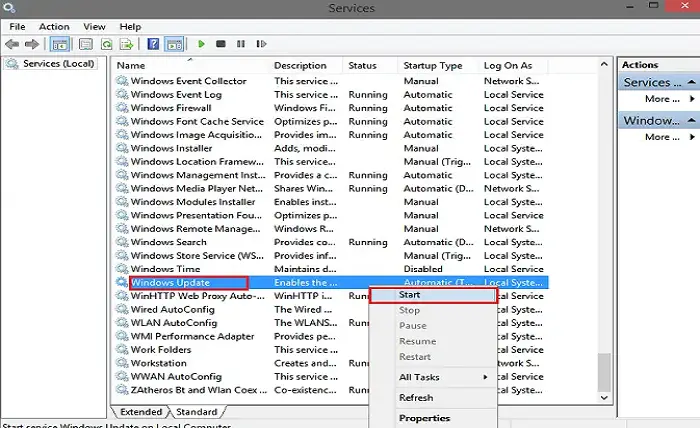
7. After this, restart your system.
Next, you run the DISM command with the sfc /scannow command.
1. At First, click on the Start button. Type in cmd.
2. Then right-click on the result shown and choose Run as administrator.
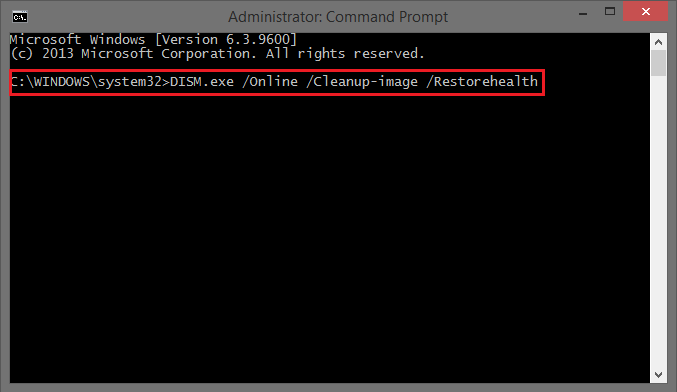
3. Afterward, type in this command in the prompt window: DISM.exe /Online /Cleanup-image /Restorehealth
4. Then, wait for the completion of the process.
5. Afterward, type in this command: sfc /scannow.

6. Wait for the process to complete. After it is done, run the Windows Update process.
After the SFC scan, you may get the message “Windows Resource Protection has found corrupted files but unable to fix them.” In this case, you can download SFCFIX 3.0 and install it on your PC. It will automatically repair the corrupted files. Check if the error 0x80070057 still exists.
Edit the Windows Registry
By changing the Windows Registry, you can solve the 0x80070057 error. Follow these steps:
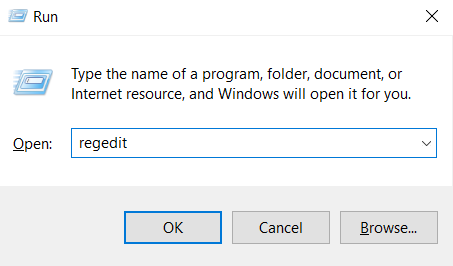
1. At First, press the Windows and R keys simultaneously. This will open the Run dialog box.
2. Then type regedit and press Enter.
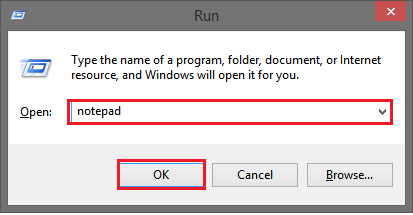
3. Again hold the Windows key and R key together.
4. Afterward, type in Notepad and click on OK.
5. In the notepad that opens, copy and paste the lines given below:
Registry Editor Version 5.00[HKEY_LOCAL_MACHINE\SOFTWARE\Microsoft\WindowsUpdate\UX]
“IsConvergedUpdateStackEnabled”=dword:00000000[HKEY_LOCAL_MACHINE\SOFTWARE\Microsoft\WindowsUpdate\UX\Settings]
“UxOption”=dword:00000000

6. Then click on File -> Save As
7. Set the file type of this file as All Files. Afterward, save this file as wufix.reg on your desktop.
8. Now run the wufix.reg file. Keep accepting the prompts. This will fix the error.
Disable the Internet while the installer is verifying updated files
In Windows 10, the error can be seen when it cannot verify the download. There are severe corruptions with the update store itself. This prevents the Anniversary Update from being installed. The solution lies in disabling the Internet.
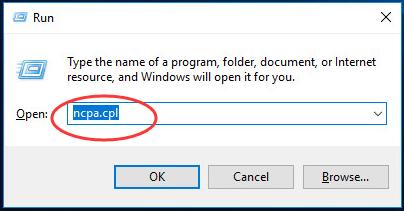
1. At First, press the Windows key and R key simultaneously. The Run dialog box will open.
2. Then type in ncpa.cpl. Click OK.
3. Afterward, right click on either your Wireless LAN Adapter or the Ethernet LAN Adapter. Then choose Disable.

Once the update has finished installing, you can right-click on the disabled adapter. Then choose Enable. This will hopefully fix the Windows 10 Anniversary Update error due to 0x80070057.
Restore Windows Update Repository
First, you need to download Reimage Plus. Then scan and restore the corrupt and missing repositories. Then try performing the Windows Update. Afterward, check if the error 0x80070057 still exists.
Link for downloading Reimage Plus: http://www.reimageplus.com/includes/router_land.php?tracking=RNWassabi&banner=${Appuals}&adgroup=0x80070057&context=${Appuals}&lpx=sys&exec=run
Perform a clean installation of Windows
This is the last method you should try. Before proceeding, you should back up all necessary documents, pictures, and other data. This is a time-consuming step. It will also erase everything from your hard drive. A clean installation will also remove all the junk and prepare your computer for normal usage.
How To Prevent Windows Update Error 0x80070057
To prevent the error code 0x80070057 from occurring during a Windows update, follow these steps:
- Make sure your computer meets the minimum system requirements for the update.
- Hardware and driver updates for your computer should look for and installed if they are available.

- Run the Windows Update Troubleshooter to automatically find and resolve any problems that might be the source of the error.
- Clear the Windows Update cache by stopping the Windows Update service, deleting the contents of the “Software Distribution” folder, and restarting the service.
- Start the System File Checker (SFC) program to find and fix any corrupted system files.
- Run the DISM tool to fix any issues with the operating system image.
- Manually download and install the update from the Microsoft Update Catalog if the above steps do not work.
- Back up all your important data before installing any updates.
It’s also recommended to check for the root cause of the error, as it’s related to a specific software or hardware component that is causing the problem.
FAQs
How can I repair the Windows 11 problem code 0x80070057?
We advise using System File Checker to scan the system if you have this problem (SFC). In Windows 10 and 11, you may use the Command Prompt to launch the System File Checker. This utility may scan the system for problems and replace unhealthy cached files with damaged ones.
Why can Windows not install on this disk?
Because you start your PC in UEFI mode, but your hard drive is not set up for UEFI mode, the chosen disk does not have a GPT partition style. Take the error message: For instance, we cannot install Windows on this drive. You have a few choices: Restart the computer in legacy BIOS compatibility mode.
How are the updates stuck, and we couldn't finish them fixed?
Delete the Storage Space and System Restore Software Distribution Folder. All updates and associated information are located in the software distribution folder. The appropriate update folder is where you delete an update to resolve an issue when your update is stuck and not finishing an activity.
How can I fix Windows?
To troubleshoot: Go to Start > Settings > Update & Security > Troubleshoot, or click the shortcut for Finding troubleshooters at the bottom of this issue. Once you have decided what kind of troubleshooting you want, click Run the troubleshooter. After letting the troubleshooter run, respond to any prompts on the screen.
Can windows that have been damaged be repaired?
Fix corrupt system files by using SFC Scan. The wonderful command-line tool System File Checker, or SFC, protects us from corrupt system files. To detect corrupt files and replace them with the cached copy, all you have to do is run a quick command in the Command Prompt app.
Conclusion
This concludes the article with seven methods given to tackle your problem. Hopefully, either work. Keep the last for the end.

Gravit Sinha: Founder of ValidEdge, a problem-solving website, driven by his lifelong passion for fixing issues.