While using Windows 10, one may encounter the problem of NVIDIA Installer Cannot Continue Error. This might occur due to various reasons. At times, Graphic Card Driver issues may occur due to incompatible graphics hardware. Such Installation failure leads the user towards annoyance and irritation.
Ways to Fix NVIDIA Installer Cannot Continue Issue:

- Method 1: Update Drivers and Enable Graphic Cards
- Method 2: Kill all NVIDIA Processes from the task manager
- Method 3: Disable Antivirus and Firewall
- Method 4: Add the Device Id of the Graphic Cards manually
- Method 5: Remove all the redundant files
The most significant challenge is to find the exact issue behind the failure of the installation.
How to Fix NVIDIA Installer Cannot Continue Issue
Just don’t panic because your worries are sure to be terminated here. There are various solutions applied to solve the issue successfully. Kindly look at all the methods explained below and follow it step by step.
Method 1: Update Drivers and Enable Graphic Cards
The drivers are always needed to be updated on time as per the requirement of the situation. Here are a few simple steps that ought to be followed to update the drivers manually.
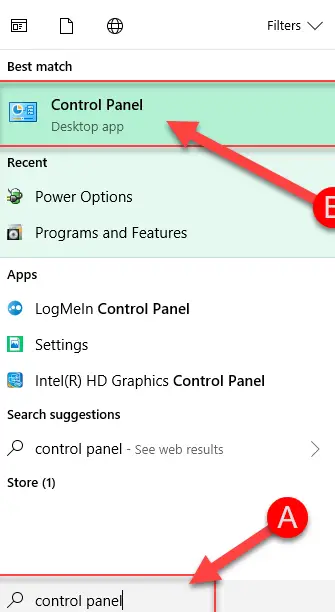
- First, Go to Start Menu.
- Then Type Control Panel in Search Bar and hit Enter.
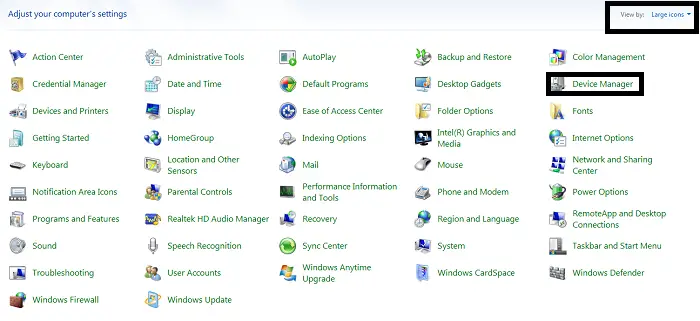 From the Control Panel items displayed, navigate below for Device Manager.
- Then Double Click on it to open.
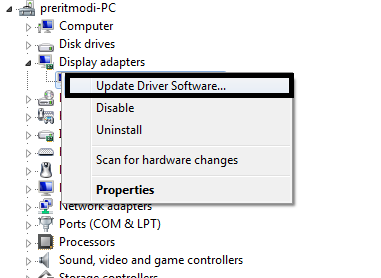
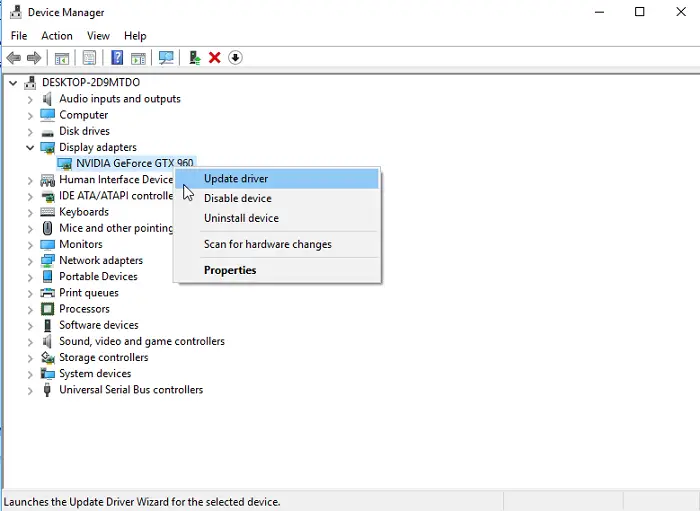
- Locate Display adapters below and expand the option. Also, check for any Display Driver Stopped Responding notification or error.

- After that, Right Click on your Nvidia Graphic Card and Select Enable.
- Once done, Again Right Click on Nvidia Graphic Card and Select Update Driver Software.
- Later, Choose the option Search Automatically for updated driver software.
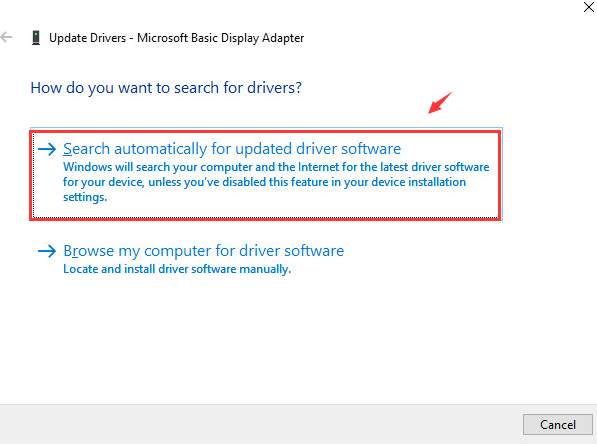
- Follow the instructions as prompted on the screen.
- Terminate the process.
- Then Check if the fix to NVIDIA Installer Failed Windows 7 Error is applied. If not, then repeat Steps 1 -7. Also, check for errors like NVIDIA Installer Cannot Continue.
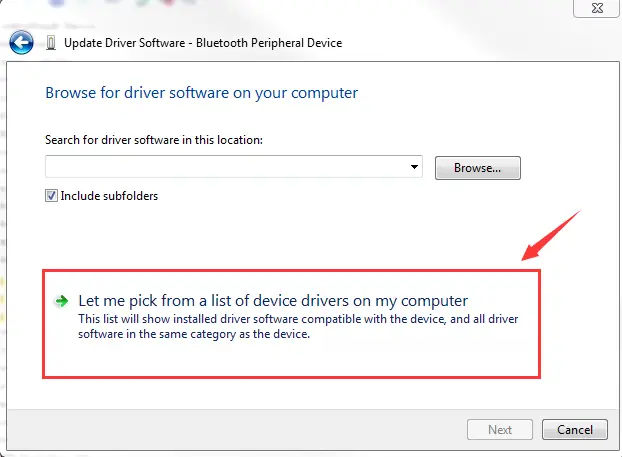
- Select Update Driver Software but select Browse my computer for driver software option on the screen prompted this time.
- Later, select Let me pick from a list of device drivers on my computer
- Now browse the compatible driver from your system.
- Then Click Next.
- After the end of the process, apply the changes you made.
Finally, Restart your System and see if you fix it. If not, your system might also have the NVIDIA Driver Crashing in Windows 10 error.
Explore below for different methods if the problem persists. Shortcut to open Device Manager:
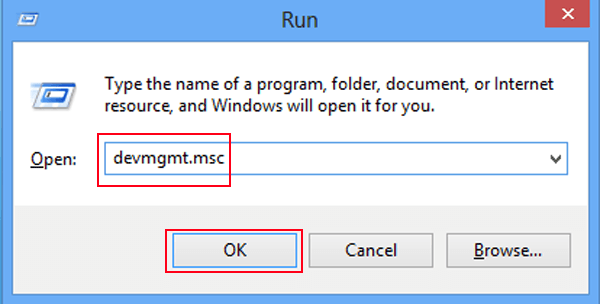
1. Press Windows Key + R to open Run Window.
2. Type devmgmt.msc and hit enter to open Device Manager.
You will like –
6 Ways to Fix Ethernet Doesn’t Have a Valid IP Configuration
{Solved} 7 Ways to Fix Steam Won’t Open Error
Method 2: Kill all NVIDIA Processes from the task manager
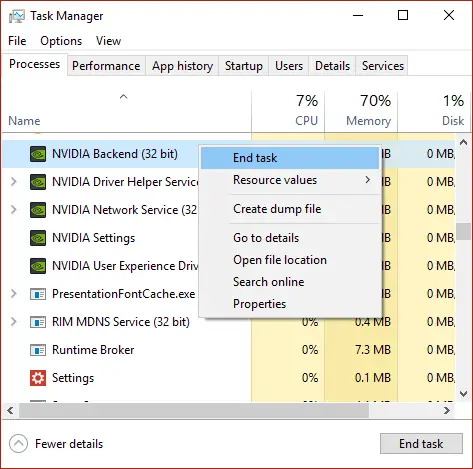
Killing the running processes related to NVIDIA is one of the solutions that can execute to resolve the problem of the NVIDIA Installer Cannot Continue Error. The steps are given below:
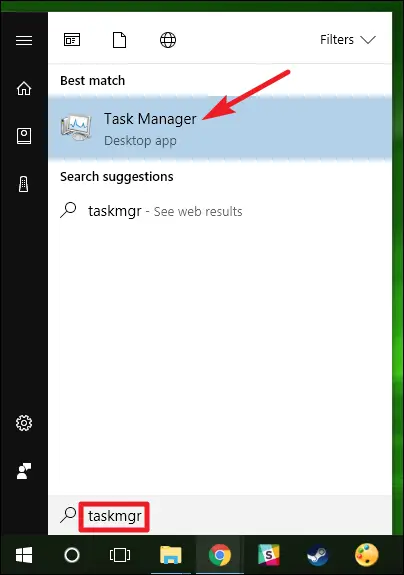
Step 1- At First, Go to Start Menu.
Step 2- Then, type Task Manager in the search bar.
Step 3- Locate the NVIDIA process and Click to End Process. Also, check for Windows 10 100% Disk Usage in Task Manager. You will find the fix on our website for this error as well.
Step 4- Finally, Restart the Computer.
Fix these errors too –
6 Ways to Fix Ethernet Doesn’t Have a Valid IP Configuration
Method 3: Disable Antivirus and Firewall
The antivirus restricts the installation of NVIDIA. We thereby suggest closing all the running firewalls and antivirus temporarily.
We can do this quickly by killing the processes related to Antivirus from the Task Manager. Then, installation can carry back again. The steps to be followed are as given below:
Bookmark This: How to Temporarily Disable Avast Antivirus
Step 1- At First, Press Ctrl+Alt+Delete to open Task Manager.

Step 2- Navigate below for all the processes related to Antivirus.
Step 3- Then Select the target process and End Process.
Step 4- Restart your system.
Step 5- Finally, Install NVIDIA again.
This is one of the solutions to NVIDIA Installer Cannot Continue Error.
Check Out:
5 Ways to Fix Windows Live Mail Won’t Open
{Solved} 13 Ways to Fix USB Ports Not Working Error
10 Ways to Fix Video Scheduler Internal Error in Windows 10
Method 4: Add the Device Id of the Graphic Cards manually
The card, at times, detects incorrectly by the system, leading to NVIDIA’s installation failure. As a solution, the device id can manually enter by the user. The steps to do so are given below:
- First, Go to Start Menu.
- Type Control Panel in Search Bar and hit Enter.
- From the Control Panel items displayed, navigate below for Device Manager.
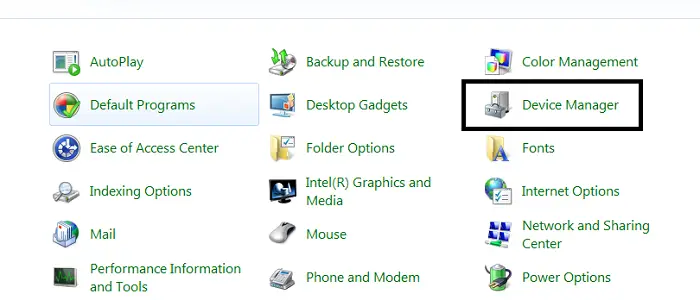
- Then Locate the Display adapters below and expand the option.

- After that, Right Click on your Nvidia Graphic Card.
- Select Properties.
- From the Properties Window, select the Details Tab.
- Then Select Hardware Ids from the drop-down menu under the Property label.
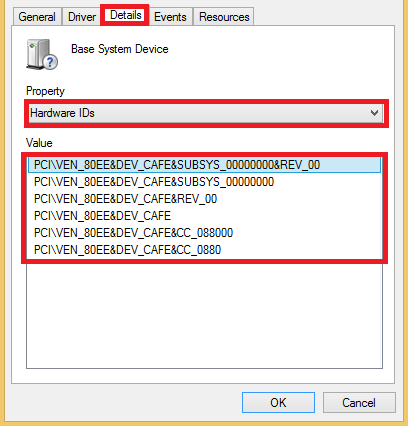
- The Id exists in the form of PCI\VEN_10DE&DEV_0FD1&SUBSYS_05781828&REV_A2\4&274689E5&0&0108 where VEN stands for Vendor-Id (10DE), and DEV stands for Device Id (0FD).
- Visit the website www.pcidatabase.com. Enter the obtained Vendor Id and Device Id.
- Then Click on the Search button.
- Now you will get the device and vendor names (NVIDIA).
- Finally, Install and Update the NVIDIA Driver to the latest version.
Method 5: Remove all the redundant files
Removal of redundant files as stated below to solve the installation failure error of the system.
The files are:C:\Windows\System32\DriverStore\FileRepository\nvdsp.inf file, C:\Windows\System32\DriverStore\FileRepository\nv_lh file, C:\Windows\System32\DriverStore\FileRepository\nvoclock file, C:\Program Files\NVIDIA Corporation\ and C:\Program Files (x86)\NVIDIA Corporation\
You might also like –
5 Ways to Fix Headphones Not Working in Windows 10
4 Ways to Fix Kmode Exception Not Handled in Windows Error
5 Ways to Fix Windows 10 Taskbar Frozen Error
FAQs
Why is the user trying to install NVIDIA experience failing?
The failure of the user's effort to install NVIDIA Experience could occur due to various factors. Common problems include damaged installation files, outdated graphics drivers, and incompatible hardware or software. Also, frequently conflicts occur with already installed software. You can find and fix the installation issue by checking the system requirements, updating drivers, disabling inappropriate apps, and ensuring you always have an internet connection.
Is the NVIDIA driver installer erasable?
Actually, the NVIDIA driver installation is rarely erasable or designed to get erased rapidly. There is no need to uninstall or clean it once you've used it to install NVIDIA drivers for your graphics card because it has already served its job. If necessary, you can uninstall or remove the NVIDIA drivers from your computer; however, this just removes the installer's supporting files and software.
How can I cleanly install the NVIDIA installer?
To fully install the NVIDIA driver, follow these steps: download the most recent driver from NVIDIA's official website; Next, launch the installer; choose the 'Custom' setup option; select the 'Perform a clean installation' checkbox during installation; To complete the installation, adhere to the on-screen directions. To finish the installation, adhere to the instructions. A new installation will help avoid conflicts and problems with your graphics card driver.
How can I improve my Nvidia GeForce experience?
To improve your NVIDIA GeForce Experience, follow these steps: First, check that your graphics driver is current using the GeForce Experience app. Utilize the app's Game Optimization function to optimize in-game settings. Keep your software up to date, make sure your system meets the requirements for maximum performance, and keep proper airflow to minimize overheating. Watch the GeForce Experience app for upgrades to the driver and fresh features.
Conclusion
At the end of this article, I hope the readers can fix the problem of the NVIDIA Installer Cannot Continue Error or NVIDIA Driver Not Installing. Out of all tries made, if you are still facing the matter, then out of no choice, you can reinstall Windows 10 again.
Now, remember to keep a backup of the essential files. For a better alternative, download and install the software name Driver Easy. Also, it will scan the error on your system and suggest updating different required errors that might exhibit the installation.

Gravit Sinha: Founder of ValidEdge, a problem-solving website, driven by his lifelong passion for fixing issues.