GDI+ Window Preventing to Shutdown Error is a very common issue. But don’t worry, as we have 3 Ways to Fix GDI+ Window Preventing Shutdown. After following one of these ways, you will be able to overcome this problem. Windows operating system has a lot of tricks up its software sleeves. There are many useful features and smart options that we all use daily but don’t always give the due credits to the operating system.
Windows GDI+ is a class-based API for C/C++ programmers. Windows users may face issues with the Graphics Device Interface on the GDI window, preventing the machine from shutting down. 3 Ways to Fix GDI+ Window Preventing Shutdown:

- Method 1: Run the Troubleshooter
- Method 2: System File Check
- Method 3: Deploy Clean Boot
GDI+ is the part of the Windows operating system that provides two-dimensional and 3-dimensional graphics. GDI+ is, as you might’ve imagined, an upgraded version of GDI. If something causes the GDI+ to misbehave, it could cause problems such as not allowing the user to shut down the operating systems in the usual way. We’ll provide you with the top methods to fix this issue. Before starting, you should remember that it could be due to any unmountable boot volume.
How to Fix GDI+ Window Preventing to Shutdown
If you are experiencing these issues where GDI+ Window is preventing the OS from shutting down, then you’re at the right place, too! This guide will go through 3 of the best possible ways of fixing the GDI+ Window, Preventing Shutdown issues.
See Also: Windows 10 Random Restart Error| 7 Quick Fixes
Method 1: Run the Troubleshooter
Sometimes, a normal troubleshooter session from our trusty old Windows control panel can bring out the issues and even fix them. Here is how you can do that.
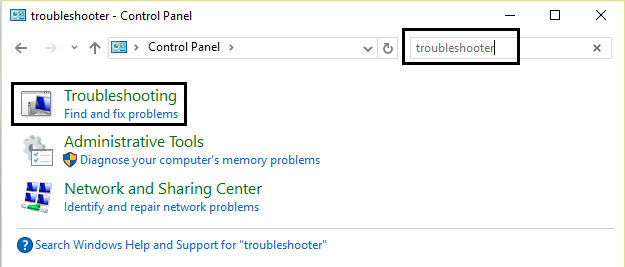
1. At First, Open the Control Panel by your method of choice. One way is by entering the Run menu using Win+R and typing Control. Then, hit OK, and the Control Panel should pop up.

2. Afterward, click on the search box. Go ahead and type something along the lines of Troubleshoot and select the Troubleshooter from the search results in the Control Panel.
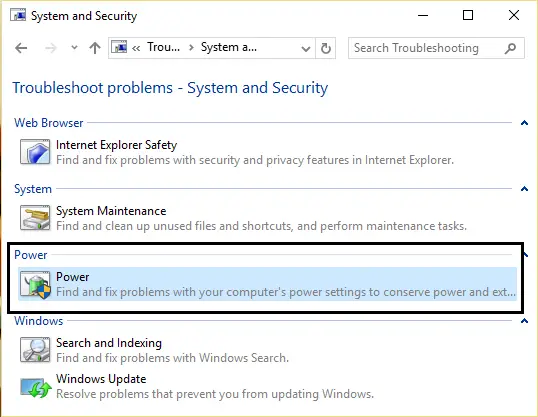
3. Then, under troubleshooting, click on System and security and click on the Power option. It will automatically find and fix problems regarding your computer’s power management portion.
4. After the troubleshooter is done doing its thing, just reboot your computer.
After the computer has been rebooted (which it hopefully did), the GDI+ Window Preventing to Shutdown issue should be resolved. If it didn’t work, or if your computer refuses to reboot in the first place, try the next methods.
See also: 4 Ways to Fix Your Computer is Low on Memory Error
Method 2: System File Check
To perform an SFC, you will need to launch the command prompt. To do that, follow these simple steps:
1. At First, Search for CMD in the windows search menu by using Win+S or Win+Q key combination.
2. Afterward, when you get the search result, right-click on it and select the option Run as Administrator.

3. Then Click Yes on the prompt message asking your permission to launch the prompt with admin privileges.
4. In the prompt window, type sfc /scannow and hit Enter.
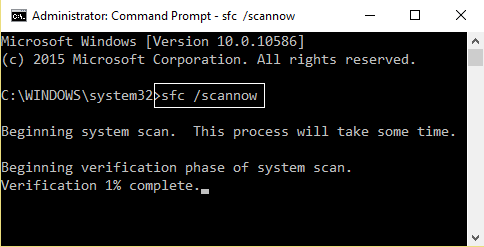
This command will scan for any irregularities in the existing software and replace any suspiciously altered ones with a backup copy commonly stored in the OS cache. And of course, this includes the GDI+ Window software as well. So, this will usually fix the issue in newer systems where the C drive does not crowd with piles and piles of software tools.
If your system is a bit too heavily loaded for the sfc command to run reliably (meaning, it will typically stop midway, at 60-something percent), then follow the next method to fix GDI+ Window Preventing to Shutdown problem in your computer. Lastly, check for any Windows Update Service not running error.
See also: Fix Windows Resource Protection could not perform the requested
Method 3: Deploy Clean Boot
A clean boot is where no third-party software runs in the background. If the GDI+ Window Preventing to Shutdown issue is caused by another software installed, booting into your system without that software running should fix the problem. You can then manually uninstall it later.
To enter into the clean boot, just follow these steps:
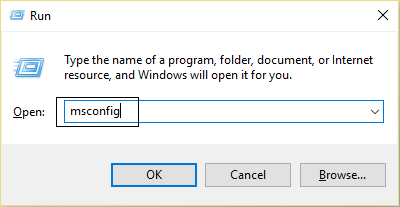
1. First, Go to the Run menu again by Pressing the Win+R keys together. Now type “msconfig” & hit OK.
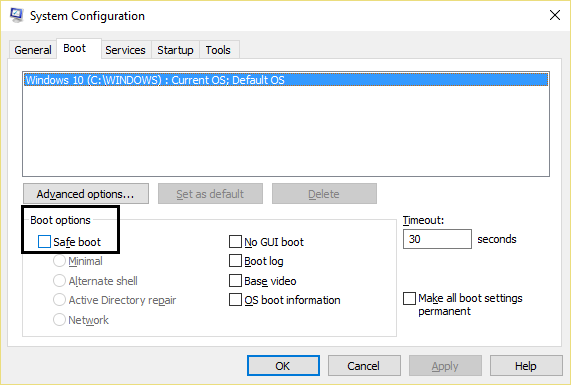
2. Then navigate to Boot tab & Uncheck the Safe boot option under Boot options.
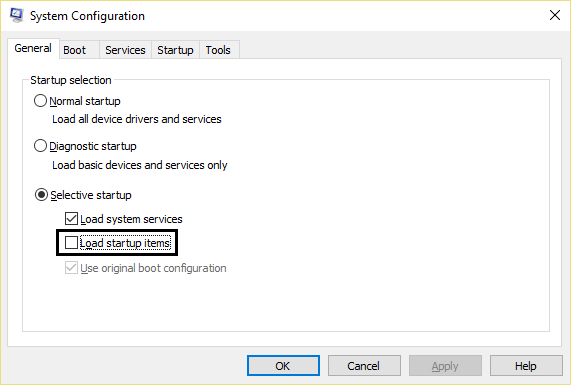
3. Then go to the tab that says General and make sure that Selective startup radio button is checked.
See also: 9 Ways to Fix Fallout 4 Crash on Startup
4. Afterward, under the Selective startup option, you need to uncheck the Load startup items option.
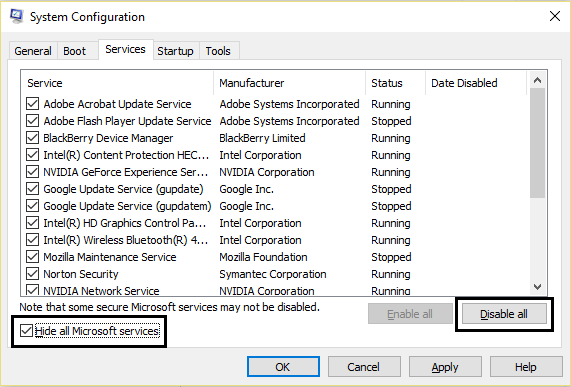
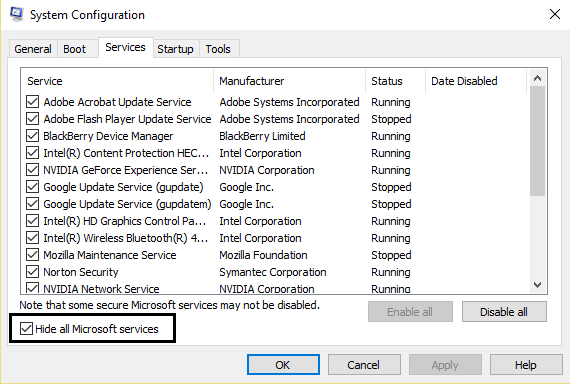
5. After that head over to the Services tab and uncheck the option that says Hide all Microsoft services. Then you need to disable all other unnecessary options, for which you can click on the Disable all button right above the hide Microsoft services check box.
6. Now, head over to the Startup tab and click on the hyperlinked option that says Open Task Manager.
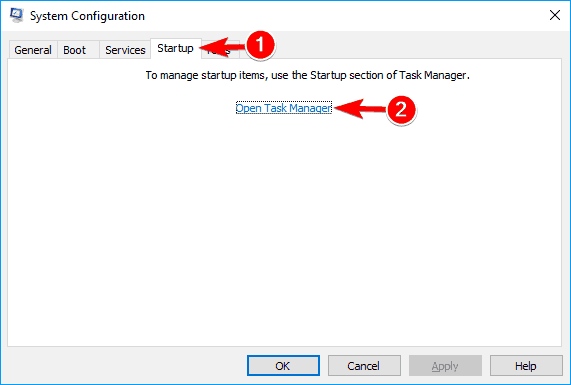
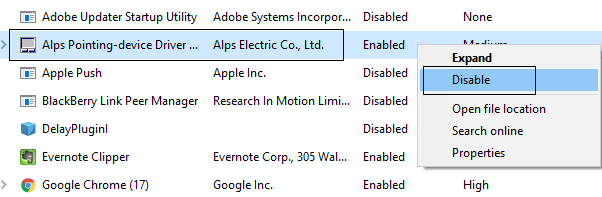
7. Finally, this will open up the task manager. In the task manager’s Startup tab, you need to change the stays of all services from enabled to disabled. Right-click to disable all the services and click OK when you are done. Now restart your system and check for any Windows 10 Random Restart Error.
Verification of GDI+ Windows Shutdown Fix
Now you need to verify the existence of the GDI+ Window Preventing Shutdown problems by enabling half the existing services. To do that:
1. First, Go back to msconfig from the Run option again. Make sure the Hide all Microsoft services is still checked. Also, check for any application error 0xc0000142 in between.
2. Then select half of the existing services list using the tick boxes next to them and enable them from the service list. Afterward, click OK and restart your system again.
FAQ’s
Why does the GDI+ window prevent my computer from shutting down? What is it?
Windows Graphics Device Interface (GDI+) includes the GDI+ window. To begin, rendering and graphical operations are its handling mechanism. Additionally, if the GDI+ window is left open, your computer may not turn off. Moreover, if an application or process that uses GDI+ encounters an error or ceases to respond.
How can I deal GDI+ window that is holding up my computer?
To begin, you may receive an error message stating that a program or process prevents shutdown. Further, when you attempt to shut down your computer, a GDI+ window contains it. Lastly, by pressing Ctrl+Shift+Esc, you can check the Task Manager for applications or processes associated with GDI+ or the GDI+ window title.
How can I resolve the problem with the GDI+ window preventing shutdown?
Stop the associated process: Select 'End task' or 'End Process' by right-clicking on the process related to the GDI+ window. Further, any unresponsive application in Task Manager (Ctrl+Shift+Esc) may also do the job. Update or reinstall the application: If a particular application is to blame, reinstall it. Further, please update it to the latest version from the manufacturer's website. Start the computer over. Minor software conflicts can work out with a simple restart. Bring it up to date: Lastly, check for and install any pending Windows updates to ensure your operating system is up to date.
To resolve the problem with the GDI+ window preventing shutdown, how do I close the related process?
To begin, open Task Manager. Then, select the Processes or Details tab. Further, locate the process associated with the GDI+ window or any unresponsive application. Lastly, right-click on it, and set 'End task' or 'End process.' This will bring the associated process to a close. The GDI+ window should now be closed, and your computer can shut down.
If none of the above solutions resolve the GDI+ window-preventing shutdown issue, what should I do?
If the problem persists after attempting the solutions as mentioned earlier, it may be beneficial to seek additional technical support or professional advice. They can give further help with diagnosing and settling the particular issue you are encountering with the GDI+ window forestalling closure.
Final Words
If the problem persists, repeat the same steps to the remaining half of the startup items in the list by enabling them and disabling the first half. You can also Run Chkdsk in Windows 10 to check for any hard disk problems. Once you have done that, you need to restore standard startup settings. To do that, go back into msconfig from the run menu and select the average startup. You will see that tick box as the first option in the general tab.
Check the normal boot box and restart your computer. Your system should now be rid of the GDI+ Window, Preventing to Shutdown problems. Enjoy!

Gravit Sinha: Founder of ValidEdge, a problem-solving website, driven by his lifelong passion for fixing issues.