The Application was unable to start correctly with the error code (0xc000007b) is a Windows Operating System bug that usually occurs after you update your system to its latest version, whether you are installing Windows 7, 8, 8.1 or 10. The most affected victims of this error are the people who use Windows 10. This error message appears when you try to run your apps or programs like Adobe Reader, VLC Player, MS Office, etc.
There are many reasons why you receive this Windows error code (0xc000007b). The error might be due to an invalid image format. If you are trying to run an application designed to run on the 64-bit operating system, but your computer is running on a 32-bit Windows. The 64-bit application won’t be able to hold on to a 32-bit dll, so this incompatibility brings the error.

Also Fix: 7 Best USB Bootable Software for Windows
The Application was unable to start correctly. The error can also be caused due to problematic software which has corrupted files, virus infections, registry errors, etc.
The Application was unable to start correctly. Error (0xc000007b) can also occur if you are not running the software as an administrator. As Windows will fail to process a particular file or the necessary settings to run the application, the software will not start correctly.
If this problem affects only one application on your system, the app might corrupt and need reinstallation. However, when this error prevents you from opening some programs, then it must be your .NET framework 3.5 or Visual C++ Redistributable Packages that are missing or corrupted. Because if, the NET framework is absent from your system, you won’t be able to run the apps we build on it.
See also: FIX: The Application Unable To Start Correctly (0xc0000005)
How to Fix The Application was Unable to Start Correctly (0xc000007b)
So if you are troubled due to The Application being unable to start correctly error, read this article further to find out the possible solutions to this error. Sometimes you need more than one fix, so you need to try them one after the other if the earlier one doesn’t work for you.
Method 1. Reinstall the corrupted application to fix the error
If The Application cannot start correctly, the error affects only one app on your computer; this method should be used. So try to launch the app through Administrative privileges. If that doesn’t work, reinstall the corrupted application:
1. Right-click on the app that is giving the 0xc000007b error.
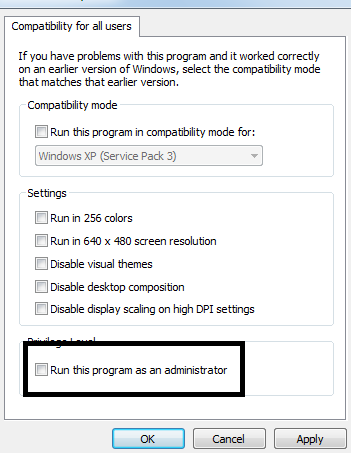
2. Select Properties and then open the Compatibility tab.
3. Then click on ‘’Run this Program as an Administrator’’ and click OK.
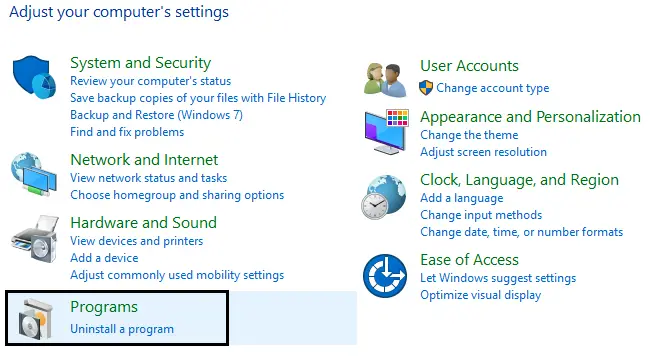
4. Now try to launch the app. If it doesn’t work, then Right-click on Windows key.
5. Afterward, select Control Panel and open Programs and Features.
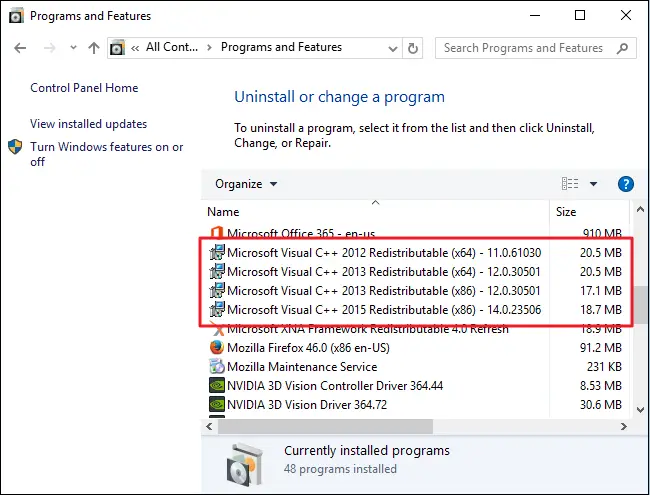
6. Now, find the corrupted app, and click on it to uninstall it.
7. Now, Re-install the app from a reliable source.
Method 2. Reinstall Microsoft Visual C++Redistributable Packages
Microsoft Visual C++ Redistributable Packages are essential for Windows applications. If they are not installed well, Programs will not be able to work regularly and will give you various errors, of which 0xc000007b is one. Microsoft releases the Visual C++ Packages in both 32-bit and 64-bit versions of your system. So if you receive The Application was unable to start error correctly due to corrupted Visual C++ Redistributable Packages, follow the steps to Re-install it:
1. At First, right-click on the Windows key and select Control Panel. Then you will find ‘’Uninstall a program’’ on the control panel; click on it.
2. Then open the Programs and Features section and remove all the Microsoft Visual C++ Redistributable items. After this, reboot your computer.
Also Check: Fix Reboot and Select Proper Boot Device
3. Now go to the official Microsoft website to download the visual runtime packages and manually install all of the Visual C++ Redistributable Packages. You need to restart your PC several times to let the installation occur.
Check Out:
10 Ways to Fix Critical Process Died Error in Windows 10
5 Ways to Fix Your Windows License Will Expire Soon Error
3 Ways to Fix Windows Update Service Not Running
4 Ways to Fix Kmode Exception Not Handled in Windows Error
Method 3. Run the Software as Administrator
Sometimes the software requires running as administrator, and The Application was unable to start correctly. An error occurs if the software is not running as Administrator. This solution works if all the users have an administrator account. So providing administrative privilege will solve your problem. To rectify The Application was unable to start correctly error:
1. First, right-click on the shortcut icon on your desktop and select the “Run as Administrator” option. Then click Yes on the popped-up message that appears, and you will be able to run the application now.
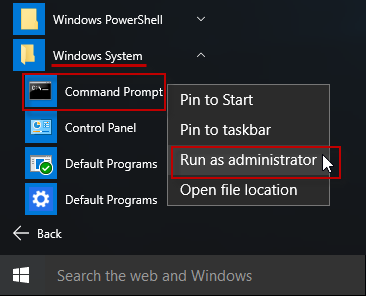
2. If you cannot find the option after right-clicking on the application icon, select the ‘’Properties’’ option from the right-click menu. Click the Compatibility tab on the Properties box and find the option ‘’Run as Administrator’’. Then click on OK.
Method 4. Reinstall Microsoft .NET Framework 3.5
The most common reason The Application was unable to start correctly error which prevents you from opening more than one app or program on your computer, is that the Microsoft .NET framework is missing, corrupted or outdated. By default, this framework is in your Windows 8 and 10 computer, so it cannot be removed or modified. But if it has been damaged or corrupted due to significant changes in your computer system, it can be fixed by downloading and installing the latest Windows updates or by running a scan with an optimization utility, Reimage. To install the updates:
You Might Be Facing: We Couldn’t Complete the Updates, Undoing Changes
1. At First, press the Windows key + I. and select Update and Security and click on Check for Updates.

2. It will display the list of updates available. Now click on the Install Updates button.

3. The reinstallation will solve The Application was unable to start correctly.
Method 5. Update DirectX
It is one of the most critical parts of your computer. You need always to ensure that your computer is updated to the latest version of DirectX so that you will not receive problems like The Application was unable to start error correctly. You can easily download and install DirectX Runtime Web Installer from Microsoft’s official website to check whether your DirectX is up to date or not. For this download, the setup file and Run it. Then follow the on-screen instructions that are displayed to reinstall it. When the installation takes place, you have to restart your computer.
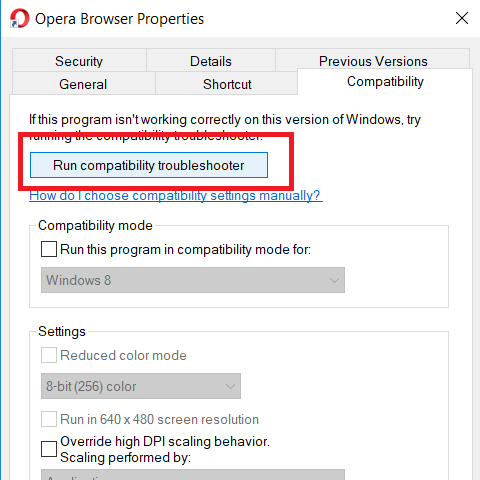
Method 6. Solve Compatibility issues between System and Application
As I mentioned earlier, sometimes The Application is unable to start correctly. An error occurs when the application running on your system is incompatible with your computer system. Sometimes software requires high-esteem configuration, but the system on your computer can’t match the requirement. So you need to change the compatibility settings between the system and the application to eliminate The Application’s inability to start correctly. To do this:
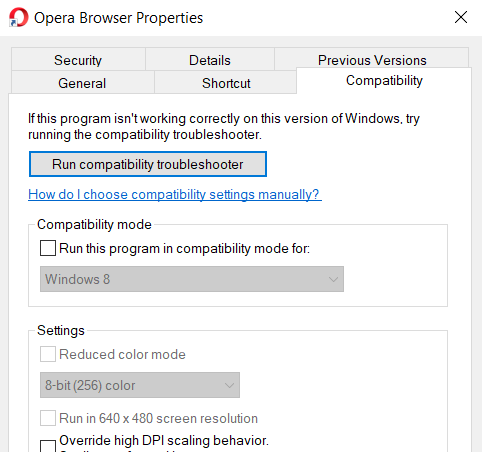
1. First, right-click on the application that does not start correctly and select Properties.
2. Then click on the Compatibility tab in the Properties window and click the button ‘’Run compatibility troubleshooter”.
3. Now select “Try recommended settings,” and you can choose to either to run the application or click on next.
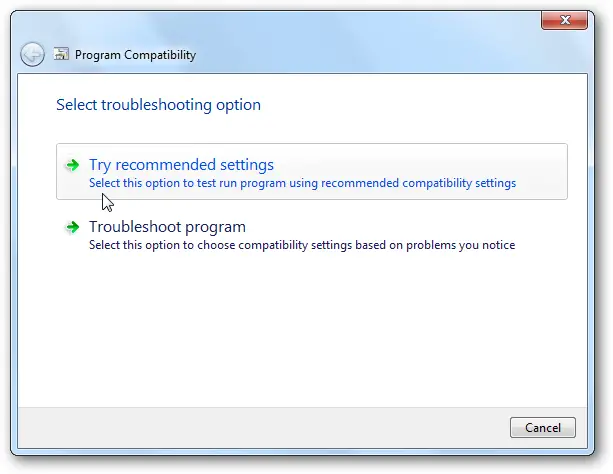
4. If the previous step doesn’t work, manually select the compatibility mode from the drop-down menu. Select the earlier version of Windows and Click Apply and OK buttons.
Method 7. Clean Boot your System
A clean boot of your system will help determine whether The Application could not start correctly. Error was caused by a third party application as it can eliminate software conflicts. You must log in to your computer as an administrator to perform a clean boot of your system. After the troubleshooting, reset your computer to start it usually. To perform a clean boot in a Windows 10 computer, follow the steps:
1. At First, click on start and search for msconfig. Click on system configuration from the search result.

2. Then select the “Service” tab on the dialogue window. Select ‘’Hide all Microsoft Services’’ and click the ‘’Disable all’’ button.
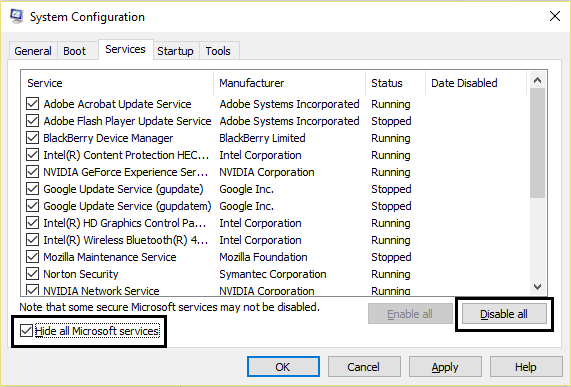
3. Afterward, click the startup tab to open “Open Task Manager.” Now select each for startup items here and click the Disable button.
4. Close Task Manager and click OK on the System Configuration window. Finally, restart your computer now.
Method 8. Check your Hard Drive with Command Prompt
Hard Drive issues sometimes create various problems, like, The Application being unable to start correctly error so checking your hard drive may help you to rectify the error problems. To check your Hard Drive for possible errors, follow the steps:
1. Run Command Prompt as Administrator on your PC. If you are a Windows 7 user, click on the Start button and type “cmd’’ in the search box. If you are a Windows 8 or 8.1 user, press the Windows key and type ‘’cmd’’. Right-click and select “Run as Administrator’’.

2. Type chkdsk c: /f /r in Command Prompt and press Enter.
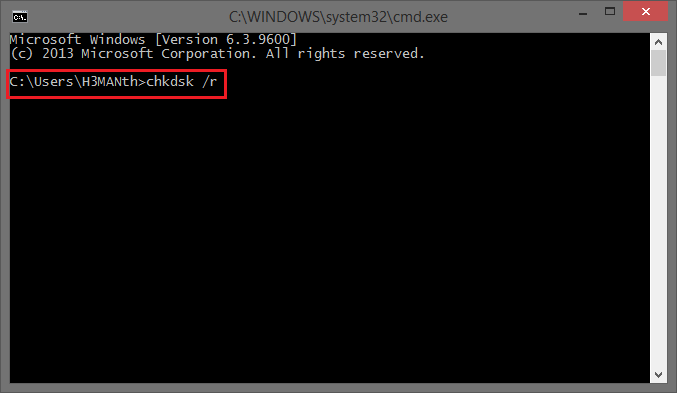
3. If your Windows is installed in C drive, you will get the message “Chkdsk cannot run because another process uses the volume. Would you like to schedule this volume to be checked the next time the system restarts?” Click on Yes here and press Enter key.
4. Your computer system will restart now so check the disk while it is restarting.
Method 9. Create a new user account
You can choose to create a new user account to check if The Application was unable to start correctly. An error occurs in the new account or not. To create a new account:
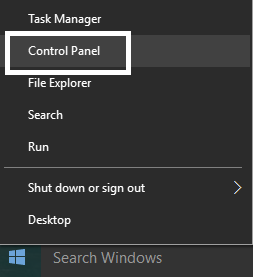
1. Click on the Start button and select “Control Panel.”
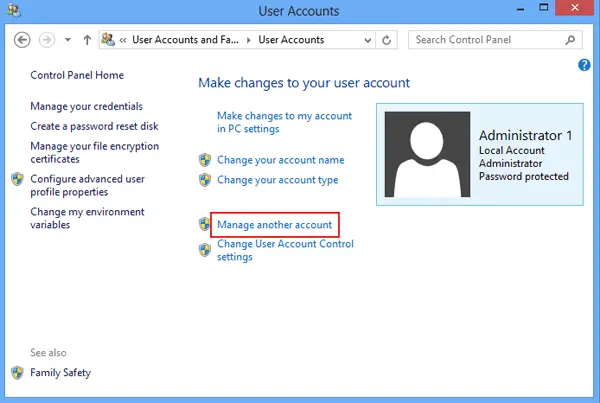
2. Select User accounts and ‘’Manage another Account’’ respectively.
3. Click on “Add a new user in PC Settings,” and next you have to follow the on-screen displayed instructions to finish the process.

4. When this process is done, login to the new user account and check if the issue occurs there.
You may also like –
- {Solved} One or More Network Protocols are Missing on This Computer
- 8 Ways to Fix Kernel Security Check Failure in Windows 10
- {Solved} 6 Ways to Fix VCRuntime140.dll is Missing Error
Method 10. Update DLL
The Application was unable to start correctly. An error might appear if the file xinput1_3.dll is corrupted or is overwritten, which is some other version that is not compatible. However, it is a slightly complicated method to fix. The Application was unable to start correctly error by updating DLL as for this method, it is required to replace the options like 32-bit xinput1_3.dll with a very appropriate version inside the C drive. So to update DLL Follow the steps below:
1. Download 32-bit xinput1_3.dll and extract files with a compression tool. Remember to back up the original ximput1_3.dll before trying this method as in case you fail to complete this process, you can restore it. The xinput1_3.dll file is usually located at C:\ Windows \SysWOW64 and pasted it there.
2. Now select Copy and Replace if there is any prompt.
FAQ’s
How can I fix the 'Application unable to start correctly' error?
To fix the error, you can reinstall the application, update your operating system and drivers, run the application as an administrator, disable compatibility mode, or perform a clean boot to eliminate software conflicts.
Can antivirus software cause the 'Application unable to start correctly' error?
Specific antivirus programs may interfere with application execution and trigger the error. Temporarily turning off the antivirus or adding the application to the antivirus's exception list may resolve the issue.
Can a corrupt user profile cause the error?
A corrupt user profile can potentially cause the 'Application unable to start correctly' error. Creating or repairing a new user profile can help resolve the issue.
Can outdated drivers trigger the error message?
Outdated or incompatible drivers can lead to the 'Application unable to start correctly' error. Updating your drivers to the latest versions from the manufacturer's website may resolve the issue.
Is reinstalling the application the only solution?
Reinstalling the application is one potential solution to fix the error. However, you can also try other troubleshooting steps, such as updating the application, repairing the installation, or checking for compatibility settings before completing a complete reinstallation.
How do I determine which application is causing the error?
To identify the specific application causing the error, check the error message details or the event viewer logs. The error message should provide the name or path of the application that failed to start correctly.
Final Words
So these were the 10 possible solutions that can be used to fix The Application was unable to start correctly error, You can opt for any of them according to your problems.

Gravit Sinha: Founder of ValidEdge, a problem-solving website, driven by his lifelong passion for fixing issues.