Run Chkdsk In Windows 10 is a prevalent issue. But don’t worry as we have 3 Ways to Fix Run Chkdsk In Windows 10. After following one of these ways, you can overcome this problem.
To run CHKDSK on Microsoft Windows 10 and Windows 8.1, follow the steps: Click on the Start menu and then select My Computer, and then Right-click on the drive that you wish to perform a check disk on and select Properties, Click on the Tools tab within the Properties window, Under the Error checking section, click on Check.

On the Windows Operating System, the users have to face a variety of errors, which are the cause of inconvenience. It creates a poor impression on the users and makes the Operating System lose its dominance in the cyber world. But, this problem is common to all the Operating Systems, not only the Windows. Thus, providing the users with the utility of fixing such errors without having to run and report to the developers every single time becomes a necessity. Check out this article on drive errors in Windows.
See Also: Fix: There Was a Problem Resetting Your PC in Windows 10
What is Chkdsk?
Chkdsk is a rough acronym for Check Disk, which helps to find out the errors related to the hard disk and even fix them. The utility in Windows Operating System is called chkdsk; in UNIX-based Operating Systems, this is called fsck or File System Check. While this utility is helpful for several people, many users hardly know its existence. Thus, the developers must make the process short and simple to focus on the developing part while the users troubleshoot the disk errors. Run Chkdsk!
Why Should You Prefer It Over Third-Party Software?
Run Chkdsk! There is no doubt that the third-party programs available perform the functions of the chkdsk utility in a similar, or sometimes in a better manner, but using the inbuilt utility has its advantages. Some of them are:
- It is a command-based utility, so the user chooses what action to take.

- It is a part of the Operating System. Thus, there is no need to turn off the system while the disk is being checked.
- It is safe with no malicious intentions whatsoever.
You may also like –
- {Solved} 6 Ways to Fix Nvlddmkm.Sys Error on Windows 10
- 4 Ways to Fix Kmode Exception Not Handled in Windows Error
- What are Vulkan RunTime Libraries? Should You Remove It?
Types of Commands
Run Chkdsk! The chkdsk is a one-line command when written in the Command Window. However the parameters mentioned in the command will prompt the actions accordingly.  Thus, knowing what each parameter means is necessary before you tell the system to check the disk.
The general command is of the following format:
chkdsk [Drive]: /[Action Parameter(s)]
In the Drive section, put the drive that needs to be checked. Run Chkdsk! In the Action Parameter section, use one or more than one parameter based on your requirements as discussed below:
- /x To force the drive to dismount
- /f To fix the errors found
- /r To recover the data contained in bad parts of the disk
- /p To check the drive superficially
Privileges Required to Run Chkdsk
Run Chkdsk! The chkdsk commands cannot be executed by anyone at any time. It needs some special permissions and access, which drives the chkdsk to be performed. The general privileges that it requires are:
- Administrator Access to the user.
- The autochk.exe file on the computer system.
Without the above privileges, it is impossible to check the disk, so ensure you have these permissions before you try running the chkdsk.
How to Run Chkdsk in Windows
Run Chkdsk! There are various methods that a user can use to check the disk of his system for obvious reasons. Those methods have been discussed below in this article.
Don’t miss out –
- 10 Ways to Fix Windows 10 Update Error Code 0x8024a105
- 3 Ways to Fix Windows Update 0x80070422 Error
- What is RAVBg64.exe? 8 Ways to Fix it
Method 1: Using the Windows Explorer
Run Chkdsk! Using Windows Explorer to run the chkdsk utility is not as difficult as it sounds. This method’s significant advantage is that it allows the user to use the computer system while it scans the disk for errors. Also, if you don’t really, it is mainly used to fix Windows Has Detected A Hard Disk Problem.
The user needs to shut down only if there are issues with the disc. The steps to perform the disk check using this method are:
1. First, Open the Computer where the drives are shown.
2. Then Right Click on the drive you want to check.
3. Click on properties, which is usually the bottom option.

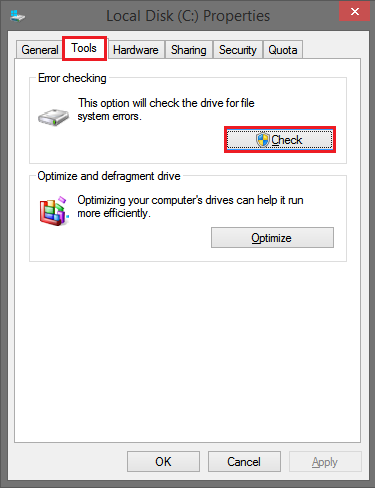
4. Then Click on Tools and Navigate to the Error Checking section.
5. Click the Check option, and the process will start afterward.
6. After completing the check, you will receive an appropriate message.
7. If you don’t have errors detected, you might skip the scanning part. But if you want to scan, click on Scan Drive.
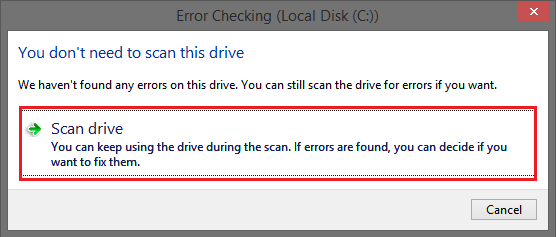
8. If it shows errors, restart the system to repair them.
It was a simple click-based method to run the chkdsk on your system. If this was a tiresome method, you could use the command prompt to do so as well.
Also, read –
- {Solved} 6 Ways to Fix BAD_POOL_CALLER BSOD Error
- 4 Ways to Fix Steam Client Bootstrapper Not Responding
Method 2: Using the Command Window
Run Chkdsk! The command window is useful for all the troubleshooting issues one can face on the Windows Operating System. Using the commands, it is possible to fix all the issues in the computer system. The process of checking the disk using this method is relatively simple and involves the following ways:
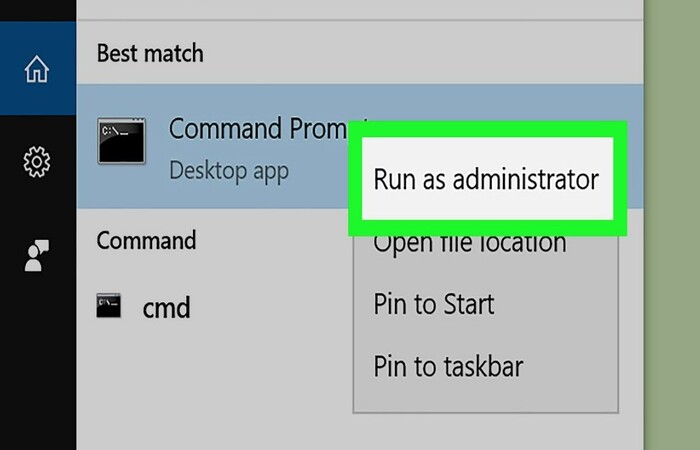
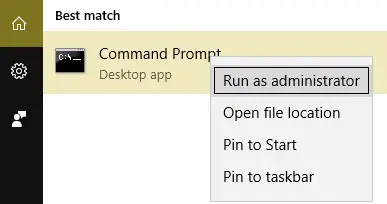
1. Press the Windows Key and right-click the Command Prompt option.
2. Then Select Run as Administrator and enter the Command Window.
3. Type in the command for disk check in the following way:
chkdsk C: /f
4. Type Y and press the Enter key. You can also use it to detect and Fix Steam Disk Write Error in Windows 10.
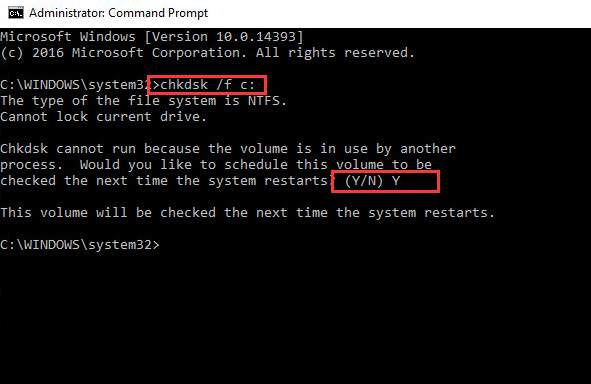
5. Exit the Command Window and restart your system.
6. The process of disk checking will begin. Wait for it to complete.
Now, the disk check has been completed, and the actions based on your commands have been executed.
You can also fix –
- {Solved} You Don’t Have Permission to Save in This Location
- 5 Ways to Fix GeForce Experience Won’t Open in Windows 10
- 4 Ways to Fix Svchost.exe High CPU Usage (netsvcs)
Method 3: Use of an External Disk
Run Chkdsk! Many times, the results are inaccurate for internal checks. Thus, one can use the Windows CD or some other drive to boot the system and run a Disk check. This method involves the following steps:
1. First, Insert the Disk into the computer system. 
2. Restart the system. While it is still booting, press any key to boot from that disk.
3. Then Press Shift + F10 to get the Command Window. 
4. Check your system drive by typing the drive letters followed by a colon. Also, chkdsk is often used to Fix Unmountable Boot Volume Errors.
5. If it displays the list of folders related to the system, use the command chkdsk followed by that drive letter.
6. Once the disk check is complete, restart the system. 
This method requires you to possess the installation disk, so it is not recommended in the first place.
Lastly, fix these too –
- {Solved} 10 Ways To Fix Discord Won’t Open Error
- 10 Ways to Fix YouTube ‘An Error Occurred, Please Try Again’
- What is Atiedxx.exe? 4 Ways to Fix It {2023 Updated}
- {Solved} 10 Ways to Fix DRIVER CORRUPTED EXPOOL
FAQs
How do I remove file type association in Windows 10?
Answer- To remove file type association in Windows, try these steps: Press the Windows key> Windows Setting> Apps> Default Apps> Reset.
How do I remove file type association in Windows 7?
Answer- To eliminate a file type association in Windows 7, perform the following actions: Access the Control Panel. Navigate to Default Programs. Opt for Associate a file type or protocol with a program. Indicate the file type for disassociation. Click Change program. Opt for None. Confirm by selecting OK.
How do I disassociate a file type in Windows 11?
Answer- In Windows 11, disassociating a file type is done through these steps: Open Settings. Go to Apps, then Default Apps. Under Choose default apps by file type, locate the file type. Click the current default app, and choose None or another app from the list to disassociate the file type.
How to remove file association in the registry editor in Windows?
Answer- To eliminate a file association using the Windows Registry Editor: Press Win + R, input regedit, and hit Enter. Go to HKEY_CURRENT_USERSoftwareMicrosoftWindowsCurrentVersionExplorerFileExts and locate the file extension. Erase the subkey linked to the extension. Close the Registry Editor and reboot for the changes to take effect.
Conclusion
These methods will help you eliminate the disk errors in your system. The Check Disk utility is somewhat risky because it might cause you to lose your data. Thus, we advise you to keep your data backed up before running chkdsk on your system.

Gravit Sinha: Founder of ValidEdge, a problem-solving website, driven by his lifelong passion for fixing issues.